EM-X270: WinCE: OSDesign Configuration
Contents
BSP Package Installation
- Close the Platform Builder Application.
- Copy the EM_X270_BSP directory into \WINCE600\Platform.
- Copy the EM_X270_CE6 directory into \WINCE600\OSDesigns.
- Launch VS2005 and open \WINCE600\OSDesigns\EM_X270_CE6\EM_X270_CE6.sln
Building the Platform Project
The EM-X270 Platform Project is used to build CompuLab’s WinCE demo image. It includes many components and is highly recommended as a starting point. The demo image size is relatively large, ~40 MB. A custom Windows CE image built for a specific application is typically much smaller and in most cases does not exceed 5-10MB.
In order to build the EM-X270 platform, select the "Open >Project/Solution" command from the File menu of the VS2005 and select the \WINCE600\OSDesigns\EM_X270_CE6\EM_X270_CE6.sln file. The Platform Project and the workspace will be opened.
Make sure that the project is configured for Release mode (the full debug image is very large and it is not recommended to build it). Perform "Rebuild Solution" from the "Build" menu (alternatively you can perform "Build-Advanced Build Commands->Clean Sysgen"). The build process takes about 15-20 minutes.
Build Options
- Use Build->Advanced Build Commands->Sysgen when you add/remove Platform Builder components (Catalog items) to/from the project.
- Use Build->Advanced Build Commands-> Build Current BSP and Subprojects when you add/remove CompuLab BSP Platform Builder components to/from the project or perform changes in BSP files.
| Do not use Build->Advanced Build Commands->Build and Sysgen or Build->Advanced Build Commands->Rebuild and Clean Sysgen commands that compile and perform sysgen on the entire Platform Builder tree. In fact, it is recommended to permanently remove these two commands from the build menu. |
Using Eboot for Development
During the LiveDisk installation Eboot (Microsoft WinCE bootloader) is stored into the NOR Flash. It can be used to establish a connection with Platform Builder for further debugging or image download. On power up, U-boot initializes hardware and transfers control to Eboot, which automatically loads the WinCE image from NAND Flash after the predefined time out interval (1s).
Eboot Access Setup
- Ensure that you have a serial terminal connected to the EM-X270 evaluation platform as described in Console setup.
- Power up the EM-X270. Check the activity of the green LED (DS1) on the EM-X270 - it should light up and then start blinking
- Check the reports on the terminal screen. It should print a welcome greeting and some hardware initialization info.
- Hit any key to stop the U-boot auto boot and enter the command prompt
- Define debug environment variable:
> setenv cmdline debug
> saveenv
- Restart the system and enter the Eboot main menu.
Eboot interface
In order to access the Eboot main menu interrupt the automatic boot sequence by pressing any key other than ENTER during the specified timeout interval. When the boot sequence is interrupted, Eboot enters menu-driven configuration mode.
--------------------------------------------------------------------------------
 Eboot Main Menu
--------------------------------------------------------------------------------
[0] IP address: 10.1.1.43
[1] Subnet Mask: 255.255.255.0
[2] Boot delay: 2 seconds
[3] DHCP: (Enabled)
[4] Auto Download image at startup(Disable)
[5] Erase Eboot Configuration Block
[6] Format NAND Flash
[7] Scrub NAND Flash (more than 5 minutes)
[D] Download image now
[F] Download and flash image now
[L] Launch existing flash resident image now
[B] Enable Debug Output (0x1)
[S] Set BSP Configuration
[C] Clean Boot(Disabled)
[H] Clean Registry Hive (Disabled)
[U] Format User Partition (Disabled)
[R] Reboot
Brief description of Eboot main menu functionality can be found below:
[0] - Set IP Address to use when downloading an image from a development station
[1] - Set Subnet Mask to use when downloading an image from a development station
[2] - Set the boot delay in range 0 - 255 seconds
[3] - Enable/Disable DHCP when downloading an image from a development station. If you use DHCP you do not need to set IP address and subnet mask
[4] - Set auto download of an image from a development station. If disabled, the WinCE image is read from the NAND Flash on startup
[5] - Erase configuration block (block 0)
[6] - Perform low level format of NAND Flash
[7] - Perform low level format of NAND Flash including bad block erase (take more than 5 min to complete)
[D] - Start download of NK.bin from Platform Builder
[F] - Start download of NK.bin from Platform Builder  and store it in the NAND Flash. The proper partition layout is created beforehand
[H] - Clean registry hive before the boot
[U] - Format user data partition (together with registry hives) before the boot
[S] - Set BSP configuration:
   [S]- Save Eboot configuration into the NAND
   [R] - Reset to factory defaults
Setup Target for EM-X270 Image Evaluation
- Connect EB-X270 extender to EM-X270
- Connect the EB-X270 Ethernet connector (P3) to your local network.
Setup Connection with Platform Builder
Perform the following steps to setup a connection between the EM-X270 evaluation platform and Platform Builder 6.0 :
- In Platform Builder, go to Target >> Connectivity Options.
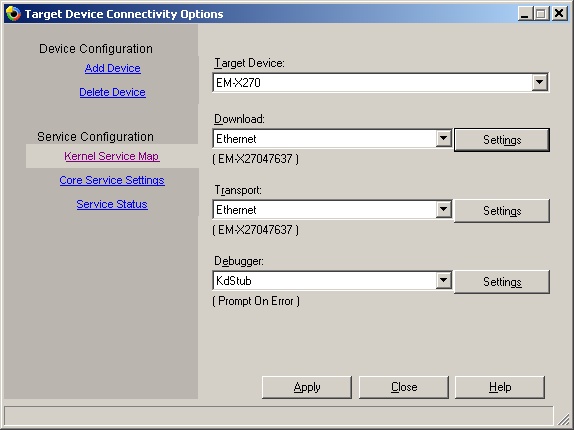
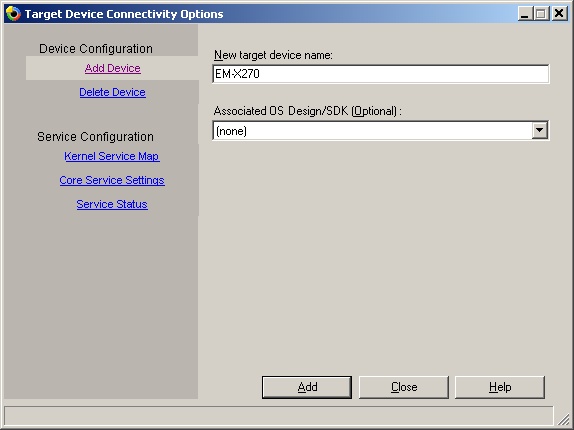
- Click on Add Device and provide a device name (e.g. EM-X270).
- In Kernel Service Map, select Ethernet for Download and Transport options and KdStub for the Debugger.
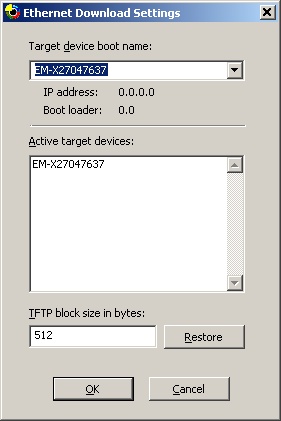
- Press Download settings and at the same time, boot the target device and press "SPACE" in the device console to get Eboot main menu.
- In the Eboot menu:
- Choose [D] to start the download. Eboot starts broadcasting "BOOT ME" messages. See the expected console output below:


 Selection: D
pKITLArgs->MAC: 0100:06C0:15BA
DM9000Init():: BaseIO[0xB2600000] : MemOffset[0x0]
<DM9000> I/O: B2600300, VID: 90000A46
DM9000 KITL ETH Driver: AutoNegotiate..
DM9000:: DM9000HWSetMCRegs():: Set all to 0x00
INFO: Davicom DM9000 Ethernet controller initialized.
INFO: MAC address: 0-1-C0-6-BA-15
System ready!
Preparing for download...
INFO: Using device name: 'EM-X27047637'
InitDHCP():: Calling ProcessDHCP()
ProcessDHCP()::DHCP_INIT
!CheckUDP: Not UDP (proto = 0x00000001)
Got Response from DHCP server, IP address: 10.1.1.178

ProcessDHCP()::DHCP IP Address Resolved as 10.1.1.178, netmask: 255.255.255.0
Lease time: 60 seconds
Got Response from DHCP server, IP address: 10.1.1.178
No ARP response in 2 seconds, assuming ownership of 10.1.1.178
+EbootSendBootmeAndWaitForTftp
Sent BOOTME to 255.255.255.255
Sent BOOTME to 255.255.255.255
- Platform Builder will show the target device unique name (e.g. EM-X27047637) in the "Active Devices" area.
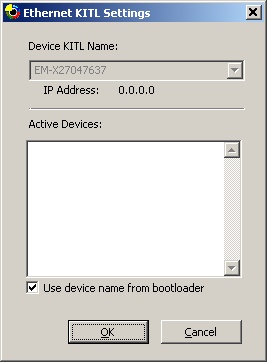
- Press Transport settings and select "Use device name from bootloader".


Download image from Platform Builder
Once the connection is configured, you can download and launch the newly created WinCE image:
- In Platform Builder Target toolbar, select the configured device and then select "Target" >> "Attach Device".
- Ensure that Eboot is ready for download (i.e. sends "BOOT ME" messages).
| Before the first download create NAND Flash layout with [F] option or perform LiveDisk installation. |
| It is recommended to enable the "Auto Download image at startup" (by pressing "4") in Eboot and save the environment using [S] option. |
WinCE Image Customization
There are two ways to customize the Windows CE image:
- Recommended method: Add or remove BSP components from the demo EM_X270_CE6 project.
- Create a new platform project and then manually add all the necessary BSP components as described in the Platform Builder documentation. Refer to Windows CE OSDesign Development page.
Managing BSP components with Platform Builder Catalog
You can select the BSP components you want to include in the run-time image by using the Platform Builder Catalog GUI. In case no significant BSP modifications are required, this is the easiest way to configure the image.
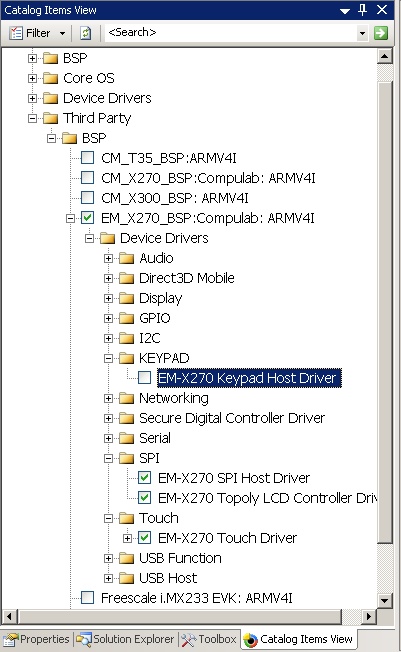
Device driver removal from the image is illustrated by the following example:
- Open catalog view in Platform Builder.
- Expand EM_X270_CE6->"Third Party"->BSP->EM_X270_BSP:ARMV4I in "Catalog Items View".
- Clear the component you want to remove. In this example the Keypad driver will not be included in the run-time image
- Once the components selection is complete, rebuild the BSP (clean build) in order for the changes to take effect.

Advanced BSP customization using batch files
Each EM_X270_BSP component can be enabled with BSP_<Component Name> and disabled with BSP_NO<Component Name> environment variables.
The BSP_<Component Name> variables are set in Platform Builder Catalog when you select some BSP item. BSP_NO<Component Name> variables are set in the EM_X270_BSP\EM_X270_BSP.bat file.
For example, in order to include the keypad driver in the BSP, set the BSP_KEYPAD variable (by choosing the Keypad Driver catalog item) and ensure that the BSP_NOKEYPAD variable is cleared.
| Environment variables defined in EM_X270_BSP\EM_X270_BSP.bat override the variables defined in Platform Builder project |
The following table lists the supported BSP_NO environment variables:
| BSP_NOFLASH | No NAND Flash Driver |
| BSP_NOUSBFN | No PXA USB Slave driver |
| BSP_NOUSB | No PXA USB Host drivers |
| BSP_NOETHER | No LAN drivers |
| BSP_NOWLAN | No WLAN drivers |
| BSP_NOSERIAL | No Serial drivers |
| BSP_NOSDHC | No SDIO card driver |
| BSP_NOAUDIO | No Audio driver |
| BSP_NOTOUCH | No Touch Screen driver |
| BSP_NOI2C | No I2C driver |
| BSP_NOGPIO | No GPIO driver |
| BSP_NOKEYPAD | No Keypad driver |
| BSP_NOREGMOD | No Startup Registry update agent |
| BSP_NODISPLAY | No Graphics |
| BSP_NOPXALCD | No PXA LCD Graphics |
| BSP_NOPXAREG | No PXA Direct registry access driver |
Subprojects
In addition to the drivers supplied with the BSP, there are a few useful utilities distributed as Subprojects. Subprojects allow adding software modules to the build without modifying the BSP source code located in the Platform source tree. There are two Subprojects types available with EM_X270_BSP.
- Subprojects that add optional functionality to the BSP are located in the \WINCE600\PLATFORM\EM_X270_BSP\Subprojects directory. These Subprojects provided with the source code.
- SetPowerState: Command line utility that controls the system power state and is used for software reboot and suspend support.
- Regedit: Command line registry editor. Allows remote changes of the device registry via telnet connection.
- CoreCon: Executables required for application level debugging over Ethernet in VS2005.
- AutoLaunch: Executable that should be used for automatic launch of CoreCon (ConmanClient2.exe) at system startup. AutoLaunch.exe verifies IP address availability before loading ConmanClient2.exe. This is required because ConmanClient2 waits for incoming TCP/IP connections when communicating with VS 2005.
- GDIRotation: Command line utility for GDI rotation of the screen. Required for automatic rotation after boot.
- The Subprojects that add custom applications, control panel applets and registry settings to the demo image are located in the \WINCE600\OSDesigns\EM_X270_CE6\Subprojects directory.
- CPLApplets\RotationCPL: Control panel applet that controls GDI rotation angle.
- CPLApplets\BacklightCPL: Control panel applet that controls LCD backlight level.
- CPLApplets\KeypadConfigCPL: Control panel applet that defines custom functionality for keypad function buttons.
- CPLApplets\ComConfigCPL: Control panel applet that controls the power state (on/off) of wireless devices.
- TCPMP: An opens source Media player
- TaskManager: An open source Task Manager
- GPSViewer: A freeware GPS utility
- Tools: BSP tools
- LookAndFeel: A look and feel of the demo image (background, theme, sounds…)
RAM-Based Registry support
Default BSP configuration enables HIVE-based registry with lazy flushing. In order to support a RAM-Based registry, you should:
- Add the RAM-based Registry (SYSGEN_FSREGRAM) Platform Builder catalog component to your project.
- Add the RAM and ROM File System (SYSGEN_FSRAMROM) Platform Builder catalog component to your project.
- Add set PRJ_ENABLE_FSREGHIVE= at the end of EM_X270_BSP_PRODUCTION.bat
- Add set PRJ_ENABLE_REGFLUSH_THREAD= at the end of EM_X270_BSP_PRODUCTION.bat (this will disable the Registry Flush thread for Hive-Based Registry)
- Perform a Clean Sysgen by using Build->Advanced Build Commands->Clean Sysgen.
Image Debugging
Platform Debugging with RETAILMSG
Debug messages to the serial port are available for both Retail and Debug build types.
To enable RETAILMSG output on COM-A, perform the following actions:
- Ensure that you have a serial terminal connected to the EM-X270 evaluation platform as described in Console setup.
- Power up the EM-X270. Check the activity of the green LED (DS1) on the EM-X270 - it should light up and then start blinking
- Check the reports on the terminal screen. It should print a welcome greeting and some hardware initialization info.
- Hit any key to stop the U-boot auto boot and enter the command prompt
- Restart the system and enter the Eboot main menu.
- Enter Eboot and perform boot from NAND (Option [L]) or from Network option[D]
Platform Debugging over Ethernet
KITL allows platform debugging over Ethernet and enables use of VS2005 Remote Tools. During debug session KITL redirects all the serial output into VS2005 output window.
- Choose the following platform options for the debug:
- Enable kernel debugger.
- Enable KITL.
- Perform Build->Advanced Build Commands ->Rebuild Current BSP and Subprojects.
- Start the debug session as outlined in Setup Target for EM-X270 Image Evaluation.
| Run-time image built with the Kernel debugger and KITL dedicates EB-X270 Ethernet port to debug communication. This port cannot be used for application Ethernet traffic. The application Ethernet traffic can be routed through virtual VMINI adapter that should be enabled in Platform Builder catalog. |
Kernel Mode vs. Application Debugging
Visual Studio 2005 provides two distinct types of debuggers.
The kernel mode debugger allows debugging of CE device drivers and kernel mode code. The kernel debugger can set breakpoints in the code that is automatically loaded at startup. This debugger utilizes the KITL protocol and supports various types of physical transports (Ethernet, USB and serial). The kernel debugger can be used to debug native code applications. It cannot be used to debug .NET managed code applications.
The VS 2005 application debugger allows .NET managed code debugging. This debugger is activated automatically whenever managed code runs.
The KITL transport and kernel mode debuggers are activated, when VS 2005 is attached to a target platform for kernel mode debugging. This prevents the activation of the application debugger. In order to run the application debugger while the kernel mode debugger is still active and connected to a target platform, you must load a separate instance of VS 2005. That instance can then connect to the target platform using the configured transport and activate its application debugger. Break points may be set in both the application and kernel mode debuggers running in separate instances of the VS 2005. However, if a break point hits in the kernel debugger and the CE kernel remains halted for too long, the application debugger might disconnect from the target platform.
See Also
Windows CE OSDesign Development
EM-X270 Serial Console Setup