Difference between revisions of "CM-QS600: Android: Getting started"
(→Boot) |
|||
| (One intermediate revision by one other user not shown) | |||
| Line 7: | Line 7: | ||
== Installation onto eMMC == | == Installation onto eMMC == | ||
| − | === | + | === Preparation steps === |
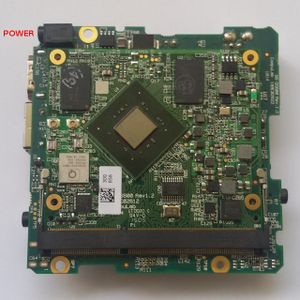
| + | [[Image:SB-QS600-top.jpg|right|thumb|CM-QS600 evaluation kit. Top view.]] | ||
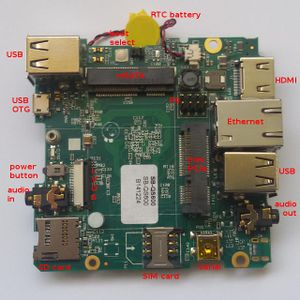
| + | [[Image:SB-QS600-bottom.jpg|right|thumb|CM-QS600 evaluation kit. Bottom view.]] | ||
* CM-QS600 evaluation kit. | * CM-QS600 evaluation kit. | ||
* PC workstation with installed [[Android: Fastboot setup | fastboot]] client software. | * PC workstation with installed [[Android: Fastboot setup | fastboot]] client software. | ||
| Line 16: | Line 18: | ||
=== Flashing Android image === | === Flashing Android image === | ||
| − | * Download | + | * Download [http://www.compulab.co.il/products/computer-on-modules/cm-qs600/#devres Android software package]. |
| − | * Decompress the file, in order to | + | * Decompress the file, in order to access Android partition images. |
| − | |||
| − | |||
| − | |||
| − | |||
| − | |||
| − | |||
| − | |||
| − | |||
| − | |||
| − | * Enter ''fastboot mode'' | + | * Enter ''fastboot mode'' - this should happen automatically, as CM-QS600 arrives with no valid boot partition. |
| − | + | {{Note | There exist additional options for [[Android: Fastboot setup#Forcing fastboot mode | forcing fastboot mode]].}} | |
| − | |||
| − | |||
| − | |||
| − | |||
| − | |||
| − | |||
| − | |||
| − | |||
* Flash each partition image file to the eMMC with the aid of ''fastboot'' utility: | * Flash each partition image file to the eMMC with the aid of ''fastboot'' utility: | ||
| Line 48: | Line 33: | ||
</pre> | </pre> | ||
| − | + | * Reboot the CM-QS600 evaluation system: | |
| − | * | ||
| − | |||
| − | |||
| − | |||
| − | |||
| − | |||
| − | |||
| − | |||
| − | |||
| − | |||
| − | |||
| − | |||
| − | |||
| − | |||
| − | |||
| − | |||
| − | |||
| − | |||
<pre> | <pre> | ||
$ fastboot reboot | $ fastboot reboot | ||
| Line 73: | Line 40: | ||
=== Boot === | === Boot === | ||
* Power on | * Power on | ||
| − | * | + | * Wait for the boot process to complete |
| − | |||
== See Also == | == See Also == | ||
| − | * [[CM-QS600: Android: Serial console connection]] | + | * [http://compulab.co.il/products/computer-on-modules/cm-qs600/#devres CM-QS600 development resources] |
| − | * [[Android: Fastboot setup]] | + | * [[CM-QS600: Android: Software package | Software package contents]] |
| − | * [[Android: ADB setup]] | + | * [[CM-QS600: Android: Serial console connection | Serial console connection]] |
| + | * [[Android: Fastboot setup | Fastboot setup]] | ||
| + | * [[Android: ADB setup | ADB setup]] | ||
[[Category:Android]] | [[Category:Android]] | ||
[[Category:CM-QS600]] | [[Category:CM-QS600]] | ||
Latest revision as of 10:49, 21 October 2015
Contents
Overview
The following outlines the procedure necessary to install Android on the CompuLab CM-QS600 System-on-Module / Computer-on-Module.
Installation target media
CM-QS600 uses on-board eMMC as root file system medium.
| Additional media might be enabled in the coming releases. |
Installation onto eMMC
Preparation steps
- CM-QS600 evaluation kit.
- PC workstation with installed fastboot client software.
- Connect HDMI display to the CM-QS600 (optional).
- Connect serial console to the CM-QS600 (optional).
- Connect USB cable between the CM-QS600 USB OTG (P7) jack and PC workstation, in order to enable fastboot protocol.
- Connect RTC battery to P15.
Flashing Android image
- Download Android software package.
- Decompress the file, in order to access Android partition images.
- Enter fastboot mode - this should happen automatically, as CM-QS600 arrives with no valid boot partition.
| There exist additional options for forcing fastboot mode. |
- Flash each partition image file to the eMMC with the aid of fastboot utility:
$ fastboot flash boot     boot.img
$ fastboot flash system   system.img
$ fastboot flash cache    cache.img
$ fastboot flash userdata userdata.img
- Reboot the CM-QS600 evaluation system:
$ fastboot reboot
Boot
- Power on
- Wait for the boot process to complete

