Difference between revisions of "CM-T335: WEC7: Getting Started"
(→Booting the system) |
|||
| Line 1: | Line 1: | ||
| − | === Creating a bootable SD card | + | The CompuLab WinCE demo image for the CompuLab CM-T335 System-on-Module / Computer-on-Module is based on standard WEC 7.0. |
| + | == Supported Features == | ||
| + | |||
| + | == Creating a bootable SD card == | ||
{{Note | The TI SDCard boot utility does not work well on computers running Windows 7, use Windows XP (WinXP mode in Windows 7 works fine too.)}} | {{Note | The TI SDCard boot utility does not work well on computers running Windows 7, use Windows XP (WinXP mode in Windows 7 works fine too.)}} | ||
* Download the latest [http://compulab.co.il/products/computer-on-modules/cm-t335/#devres WEC 7.0 runtime image for CM-T335] and unzip the file. | * Download the latest [http://compulab.co.il/products/computer-on-modules/cm-t335/#devres WEC 7.0 runtime image for CM-T335] and unzip the file. | ||
| Line 14: | Line 17: | ||
# Your SD card is now ready to boot the CM-T335. | # Your SD card is now ready to boot the CM-T335. | ||
| − | + | == Booting the system == | |
| − | * Install the bootable SD card on the CM-T335 micro SD slot ( | + | * Install the bootable SD card on the CM-T335 micro SD slot (P23). |
* Power on the device. A synthetic splash-screen (4 colored squares) will appear on LCD display within a few seconds. | * Power on the device. A synthetic splash-screen (4 colored squares) will appear on LCD display within a few seconds. | ||
| + | |||
| + | == Flashing the image into NAND flash memory via SD card == | ||
| + | * In order to run the image from NAND flash, XLDRNAND.BIN/EBOOTNAND.BIN/NK.bin must be written into NAND FLASH via SD card. | ||
| + | |||
| + | * Copy EBOOTND.bin/XLDRNAND.bin/NK.bin to SD card from LiveDisk_SD folder to the bootable SD card created. | ||
| + | |||
| + | * Connect the CM-T335 to your desktop serial port with a cable is supplied in the evaluation kit. If your desktop does not have a serial port, it is possible to use a standard USB to serial adapter. | ||
| + | |||
| + | * Start a terminal emulation software on the host PC using following settings: | ||
| + | ** Baud rate: 115200 | ||
| + | ** Parity: None | ||
| + | ** Data bits: 8 | ||
| + | ** Stop bits: 1 | ||
| + | |||
| + | * To flash XLDR/Eboot/nk.bin from SD card: | ||
| + | 1. Turn on the CM-T335 system and hit space to enter the Eboot's configuration menu: | ||
| + | <br> [[Image:X300_Eboot.JPG]]<br> | ||
| + | |||
| + | 2. Enable flashing by select following option from Eboot menu: | ||
| + | |||
| + | [Flash Management] -> [8]Enable flashing NK.bin | ||
| + | 3. Change the SDcard settings for image name to eboot.bin/xldrnand.bin/nk.bin from following Eboot Menu: | ||
| + | |||
| + | [SDCard Settings] -> [Enter Filename] | ||
| + | 4. Select boot from SD card: | ||
| + | |||
| + | [Select Boot Device] -> [NK from SDCard File] | ||
| + | * If NK.bin is loaded, after flashing, the program will continue to boot Kernel. If XLDR/EBoot is loaded, reboot is needed. | ||
| + | {{Note | 2 reboots are needed in order to complete the process.}} | ||
| + | {{Warning|Do not reset or power off the CM-T335 during the installation process! Doing so may result in a disabled module! }} | ||
== See also == | == See also == | ||
Revision as of 07:47, 31 December 2014
The CompuLab WinCE demo image for the CompuLab CM-T335 System-on-Module / Computer-on-Module is based on standard WEC 7.0.
Contents
Supported Features
Creating a bootable SD card
| The TI SDCard boot utility does not work well on computers running Windows 7, use Windows XP (WinXP mode in Windows 7 works fine too.) |
- Download the latest WEC 7.0 runtime image for CM-T335 and unzip the file.
- Use the TI_SDCard_boot_utility to create a disk with partition table geometry compatible with the OMAP3 boot ROM.
- Follow the steps below:
- Insert the SD card into an SD-Reader attached to the desktop computer (an SD-card is supplied with the CM-T335 evaluation kit).
- Launch the TI_SDCard_boot utility (located in the Utils folder).
- Choose the drive letter of the SD reader.
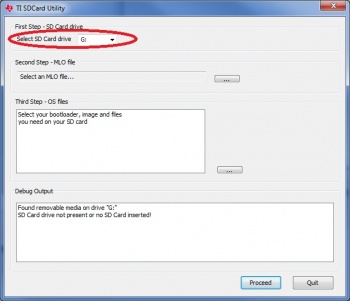
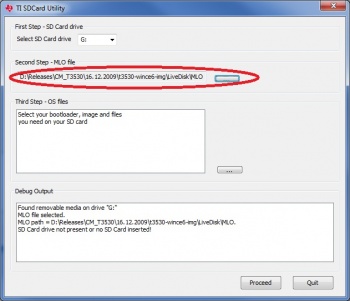
- Select the MLO file from the LiveDisk folder.
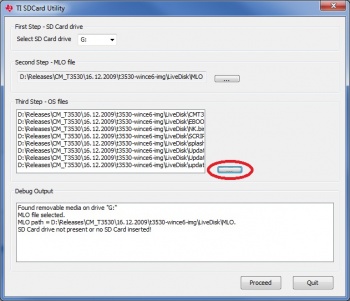
- Select the rest of the files in the LiveDisk folder.
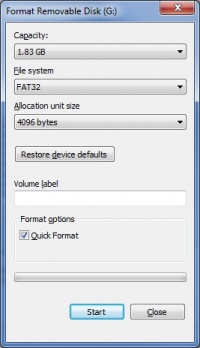
- Select the FAT 32 filesystem and 4096 bytes allocation unit size in the Format Removable Disk pop-up and start the SD card format process.
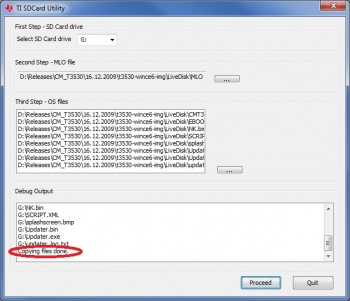
- After the formatting is complete, the utility automatically starts to copy the files to the SD card.
- Wait for the "Copying files done" message to appear in the debug output box.
- Your SD card is now ready to boot the CM-T335.
Booting the system
- Install the bootable SD card on the CM-T335 micro SD slot (P23).
- Power on the device. A synthetic splash-screen (4 colored squares) will appear on LCD display within a few seconds.
Flashing the image into NAND flash memory via SD card
- In order to run the image from NAND flash, XLDRNAND.BIN/EBOOTNAND.BIN/NK.bin must be written into NAND FLASH via SD card.
- Copy EBOOTND.bin/XLDRNAND.bin/NK.bin to SD card from LiveDisk_SD folder to the bootable SD card created.
- Connect the CM-T335 to your desktop serial port with a cable is supplied in the evaluation kit. If your desktop does not have a serial port, it is possible to use a standard USB to serial adapter.
- Start a terminal emulation software on the host PC using following settings:
- Baud rate: 115200
- Parity: None
- Data bits: 8
- Stop bits: 1
- To flash XLDR/Eboot/nk.bin from SD card:
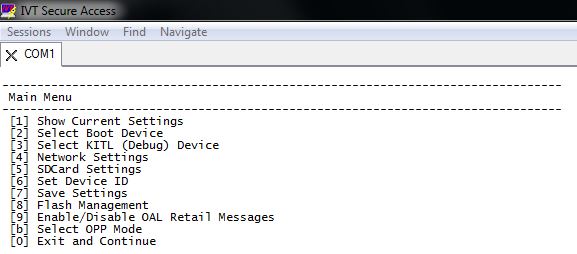
1. Turn on the CM-T335 system and hit space to enter the Eboot's configuration menu:
2. Enable flashing by select following option from Eboot menu:
[Flash Management] -> [8]Enable flashing NK.bin
3. Change the SDcard settings for image name to eboot.bin/xldrnand.bin/nk.bin from following Eboot Menu:
[SDCard Settings] -> [Enter Filename]
4. Select boot from SD card:
[Select Boot Device] -> [NK from SDCard File]
- If NK.bin is loaded, after flashing, the program will continue to boot Kernel. If XLDR/EBoot is loaded, reboot is needed.
| 2 reboots are needed in order to complete the process. |
| Do not reset or power off the CM-T335 during the installation process! Doing so may result in a disabled module! |
