Difference between revisions of "CM-FX6: Android: Getting started"
(→Preconditions) |
(→Normal operation) |
||
| Line 5: | Line 5: | ||
== Creating a bootable SD-Card == | == Creating a bootable SD-Card == | ||
| − | * Download | + | * Download compressed [http://compulab.co.il/products/computer-on-modules/cm-fx6/#devres SD-Card image]. |
| − | * Unzip the file in order to get | + | : Ensure integrity of the downloaded file by testing its MD5 summary. |
| − | * Copy the bootable image to the SD-Card following the [https://help.ubuntu.com/community/Installation/FromImgFiles instructions provided] for selection of operating systems. | + | * Unzip the file in order to get ''dd'' image.<br/> |
| − | + | * Copy the bootable image to the SD-Card following the [https://help.ubuntu.com/community/Installation/FromImgFiles instructions provided] for selection of operating systems. | |
| + | : On Linux, the instructions below may may be used instead: | ||
| + | <pre> | ||
| + | # dd if=cmfx6-android.img of=/dev/sdc | ||
| + | </pre> | ||
== Boot == | == Boot == | ||
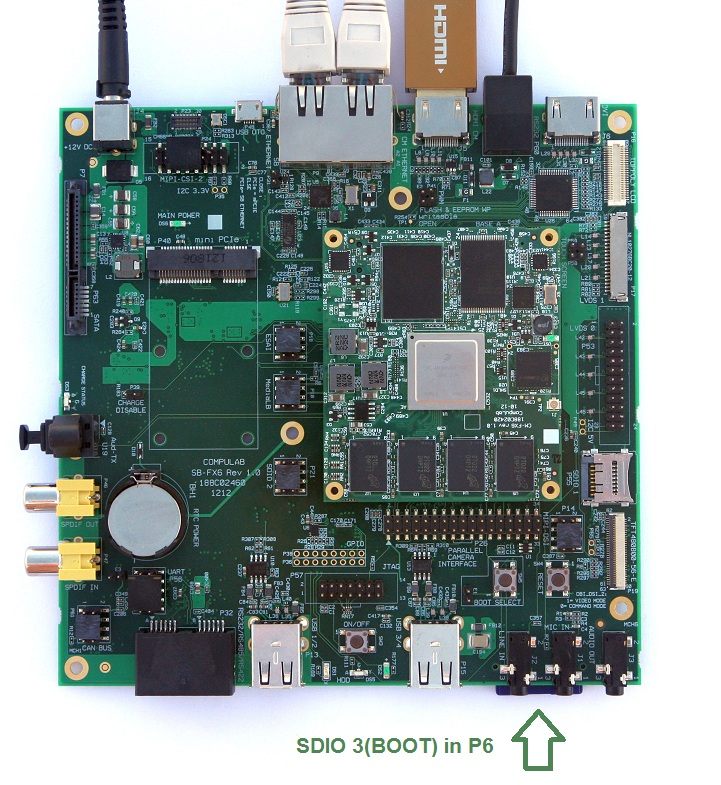
* Insert the bootable SD-Card into P6 SD-Card slot. | * Insert the bootable SD-Card into P6 SD-Card slot. | ||
| − | * Power on | + | * Power on. |
| − | * Within 3 seconds the device should start booting into Android. | + | * Within 3 seconds the device should start booting into Android. |
| − | ===Advanced boot=== | + | : Within 60 seconds the HDMI display should start showing ''signs of life''. |
| + | |||
| + | === Advanced boot === | ||
By default CM-FX6 uses HDMI display with 1080p resolution.<br/> | By default CM-FX6 uses HDMI display with 1080p resolution.<br/> | ||
This can be changed by providing alternate boot arguments to the Android/Linux kernel. | This can be changed by providing alternate boot arguments to the Android/Linux kernel. | ||
* Connect to the serial console as explained in the [[CM-FX6: Android: Serial console connection | Development]] section. | * Connect to the serial console as explained in the [[CM-FX6: Android: Serial console connection | Development]] section. | ||
* Press ENTER to stop the countdown. | * Press ENTER to stop the countdown. | ||
| − | + | <pre> | |
| − | + | setenv videomode video=mxcfb0:dev=ldb,if=RGB24,1280x720M@60 fbmem=28M # DVI display with 720p resolution | |
| + | setenv videomode video=mxcfb0:dev=hdmi,if=RGB32,1920x1080M@60 fbmem=48M # default video mode | ||
| + | setenv videomode video=mxcfb0:dev=lcd,if=RGB666,SCF04-WVGA # LCD display connected P50 LCD connector | ||
| + | </pre> | ||
* Type in '''boot''' to proceed to kernel boot overriding default video mode. | * Type in '''boot''' to proceed to kernel boot overriding default video mode. | ||
| − | == | + | == Normal operation == |
| − | * | + | * If the CM-FX6 module went to sleep, it can be woken up by a short press on '''ON/OFF''' button on the base board. |
| − | * | + | : Additional press on '''ON/OFF''' button will send the device back to sleep. |
| + | : Pressing and holding the '''ON/OFF''' button for more than 5 seconds, will unconditionally power the module down. This operation is pretty much equivalent to unplugging the power supply, so it should really be considered the last resort. | ||
| + | : Yet another press on '''ON/OFF''' button will bring the power back. | ||
| + | * Graceful shutdown | ||
| + | : Due to specifics of i.MX6 SoC hardware, the ON/OFF button cannot be used to bring up the Android '''Power off''' menu. | ||
| + | : CM-FX6 pre-configures GPIO 29 (P18, pin 2 on SB-FX6 base board) as GPIO Power Button. As GPIO 29 has an internal pull-up resistor, it can be momentarily connected to the ground to produce a 'power button press'. Short press will behave identically to short press on ON/OFF button, whereas long press will bring up the '''Power off''' menu allowing graceful shutdown. | ||
| + | |||
| + | == See Also == | ||
| + | * [[CM-FX6: Android: Linux kernel]] | ||
| + | * [[CM-FX6: Android: Serial console connection]] | ||
| + | * [https://help.ubuntu.com/community/Installation/FromImgFiles Installing SD Card image] | ||
| − | [[Category:Android | + | [[Category:Android]] |
| − | [[Category:CM-FX6 | + | [[Category:CM-FX6]] |
Revision as of 09:03, 11 July 2013
Contents
Preconditions
- PC workstation
- CM-FX6 evaluation kit properly connected
- SD-Card with minimal capacity of 2GB, which will serve as the boot source
Creating a bootable SD-Card
- Download compressed SD-Card image.
- Ensure integrity of the downloaded file by testing its MD5 summary.
- Unzip the file in order to get dd image.
- Copy the bootable image to the SD-Card following the instructions provided for selection of operating systems.
- On Linux, the instructions below may may be used instead:
# dd if=cmfx6-android.img of=/dev/sdc
Boot
- Insert the bootable SD-Card into P6 SD-Card slot.
- Power on.
- Within 3 seconds the device should start booting into Android.
- Within 60 seconds the HDMI display should start showing signs of life.
Advanced boot
By default CM-FX6 uses HDMI display with 1080p resolution.
This can be changed by providing alternate boot arguments to the Android/Linux kernel.
- Connect to the serial console as explained in the Development section.
- Press ENTER to stop the countdown.
setenv videomode video=mxcfb0:dev=ldb,if=RGB24,1280x720M@60 fbmem=28M      # DVI display with 720p resolution
setenv videomode video=mxcfb0:dev=hdmi,if=RGB32,1920x1080M@60 fbmem=48M    # default video mode
setenv videomode video=mxcfb0:dev=lcd,if=RGB666,SCF04-WVGA                 # LCD display connected P50 LCD connector
- Type in boot to proceed to kernel boot overriding default video mode.
Normal operation
- If the CM-FX6 module went to sleep, it can be woken up by a short press on ON/OFF button on the base board.
- Additional press on ON/OFF button will send the device back to sleep.
- Pressing and holding the ON/OFF button for more than 5 seconds, will unconditionally power the module down. This operation is pretty much equivalent to unplugging the power supply, so it should really be considered the last resort.
- Yet another press on ON/OFF button will bring the power back.
- Graceful shutdown
- Due to specifics of i.MX6 SoC hardware, the ON/OFF button cannot be used to bring up the Android Power off menu.
- CM-FX6 pre-configures GPIO 29 (P18, pin 2 on SB-FX6 base board) as GPIO Power Button. As GPIO 29 has an internal pull-up resistor, it can be momentarily connected to the ground to produce a 'power button press'. Short press will behave identically to short press on ON/OFF button, whereas long press will bring up the Power off menu allowing graceful shutdown.