Difference between revisions of "CM-X300: WinCE: OSDesign Configuration"
(→Image Debugging) |
(→Platform Debugging over Ethernet) |
||
| Line 219: | Line 219: | ||
** Enable KITL. | ** Enable KITL. | ||
* Perform {{MenuEntry|Build->Advanced Build Commands ->Rebuild Current BSP and Subprojects}}. | * Perform {{MenuEntry|Build->Advanced Build Commands ->Rebuild Current BSP and Subprojects}}. | ||
| − | * Start the debug session as described in [[# | + | * Start the debug session as described in [[#KITL_Connection|Setup Target for CM_X300 Image Evaluation]] section. |
{{Note|Run-time image built with the Kernel debugger and KITL dedicates CM-X300 Ethernet port to debug communication. This port cannot be used for application Ethernet traffic. The application Ethernet traffic can be routed through virtual VMINI adapter that should be enabled in [[CM-X300: WinCE: Configuring Eboot|Eboot configuration]].}} | {{Note|Run-time image built with the Kernel debugger and KITL dedicates CM-X300 Ethernet port to debug communication. This port cannot be used for application Ethernet traffic. The application Ethernet traffic can be routed through virtual VMINI adapter that should be enabled in [[CM-X300: WinCE: Configuring Eboot|Eboot configuration]].}} | ||
Revision as of 11:00, 8 April 2010
Contents
Installing the Driver Package
- Close the Platform Builder Application if it is open.
- Copy the CM_X300_BSP directory to \WINCE600\Platform\
- Copy the CM_X300_CE6 directory to \WINCE600\OSDesigns\
- Launch VS2005 and open \WINCE600\OSDesigns\CM_X300_CE6\CM_X300_CE6.sln
Building the Platform Project
The CM_X300 Platform Project is used to build CompuLab Windows Embedded CE demo image. It includes many components and is highly recommended as a starting point for a new project. The demo image is relatively large, ~35 MB. Typical Windows CE images for a specific application are much smaller, 8-15 MB.
To build the CM_X300 platform:
- select the Open->Project/Solution command from the File menu of the VS2005 and select the \WINCE600\OSDesigns\CM_X300_CE6\CM_X300_CE6.sln file.
- Check that the project is configured for Release.
- Perform Rebuild Solution from the Build menu (alternatively, perform Build->Advanced Build Commands->Clean Sysgen ).
The build process takes about 15-20 minutes.
CPU Type
The CM-X300 may be assembled with two CPU types:
- PXA300 - the C624 option
- PXA310 - the C624M option
The default BSP configuration targets the PXA310 CPU.
Choosing CPU Type
The CPU type is defined in CM_X300_BSP.BAT file in the platform directory. Ensure that the BSP_CPU_TYPE setting corresponds with the correct CPU type. Leave the appropriate line without the REM directive:
set BSP_CPU_TYPE=310
REM set BSP_CPU_TYPE=300
Build Options
- Use Build->Advanced Build Commands->Sysgen when adding Platform Builder components (Catalog items) to the project.
- Use Build->Advanced Build Commands->Clean Sysgen when removing Platform Builder components (Catalog items) from the project.
- Use Build->Advanced Build Commands->Build Current BSP and Subprojects when modifying Compulab BSP components that are included in the project or performing changes in the BSP files.
- Use Build->Advanced Build Commands-> Rebuild Build Current BSP and Subprojects when adding/removing Compulab BSP components to/from the project.
Windows CE Image Customization
There are two ways to customize the Windows CE image:
- Recommended method: Add or remove BSP components from the demo CM_X300_CE6 project.
- Create a new platform project and then manually add all the necessary BSP components as described in the Platform Builder documentation. Refer to Windows CE OSDesign Development page.
BSP customization using batch files
The BSP is fully customizable and allows inclusion/exclusion of each component via BSP_NO environment variables.
To exclude a certain driver, set the BSP_NO environment variables in CM_X300_BSP\CM_X300_BSP_COMMON.bat and rebuild the BSP with Build->Advanced Build Commands->Rebuild Current BSP and Subprojects .
The following table lists the BSP_NO environment variables that can be defined:
| Variable | Meaning | Comments |
| BSP_NOKEYPAD | No Keypad driver and no support for keyboard | |
| BSP_NODISPLAY | No Graphics | |
| BSP_NONAND | No NAND Flash driver | |
| BSP_NOSDHC | No SDIO card driver | |
| BSP_NOWLAN | No WiFi driver | |
| BSP_NOI2C | No I2C driver | |
| BSP_NOUSB20FN | No Usb 2.0 Function driver | |
| BSP_NOUSBFN | No Usb 1.1 Function driver | |
| BSP_NOUSBHOST | No Usb Host driver | |
| BSP_NOAUDIO | No Audio driver | |
| BSP_NOTOUCH | No Touch screen driver | |
| BSP_NOCODEC | No Codec driver | (no Touch and no Audio) |
| BSP_NOBLUETOOTH | No BlueTooth Driver | No Bluetooth stack as well |
| Any environment variable defined in CM_X300_BSP\CM_X300_BSP_COMMON.bat will override the variables defined in Platform Builder project |
RAM-Based Registry support
The CM-X300 BSP is configured for HIVE-based registry with lazy flushing. The registry hive is located in the system NAND flash. To support a RAM-Based registry, perform the following actions:
- Add the RAM-based Registry component to the project
- Disable the following variables in the CM_X300_BSP\CM_X300_PRODUCTION.bat:
set PRJ_ENABLE_FSREGHIVE=1
set PRJ_ENABLE_REGFLUSH_THREAD=1
- Perform "Clean Sysgen" using Build->Advanced Build Commands->Clean Sysgen
Persistent File System
The CM-X300 BSP is configured to store the root directory in RAM, therefore the root filesystem is not persistent. To make the root and its subsequent folders persistent, change the Catalog item "ROM and RAM File System" to "ROM-Only file System".
| Any data saved to a non-persistent location is erased when the device resets. This includes the root directory ("\"). |
CM-X300 BSP Subprojects
In addition to the drivers supplied with the BSP, there are a few useful utilities distributed as Subprojects. Subprojects allow adding software modules to the build without modifying the BSP source code located in the Platform source tree. There are two Subproject types available with CM_X300_BSP:
- Subprojects that add optional functionality to the BSP are located in the \WINCE600\PLATFORM\CM_X300_BSP\Subprojects directory.
- These Subprojects are provided with the source code.
| Project Name | Functionality |
| SetPowerState | Command line utility that controls the system power state and is used for software reboot and suspend support |
| Regedit | Command line registry editor. Allows remote changes of the device registry via telnet connection. |
| CoreCon | Executables required for application level debugging over Ethernet in VS2005 |
| AutoLaunch | Executable that should be used for automatic launch of CoreCon (ConmanClient2.exe) at system startup. AutoLaunch.exe verifies IP address availability before loading ConmanClient2.exe. This is required because ConmanClient2 waits for incoming TCP/IP connections when communicating with VS 2005 |
| SysConf | Command line utility for platform debugging |
| Tools |
|
| BuildVer | This project adds a text file to the image specifying which revision was used to build the image. It requires a Tortoise Svn client installed on the desktop. |
- The Subprojects that add custom applications, control panel applets and registry settings to the demo image are located at \WINCE600\OSDesigns\CM_X300_CE6\Subprojects directory.
| Project Name | Functionality |
| CPLApplets\WireLessCPL | Control panel applet that controls the power state (on/off) of wireless devices |
| CPLApplets\KeypadConfigCPL | Control panel applet that customizes keypad buttons functionality |
| CPLApplets\BacklightCPL | Control panel applet that controls the LCD backlight level |
| TCPMP | Open source Media player |
| TaskManager | Open source Task Manager |
| KeypadAppLaunch | A utility to capture application launching key presses |
| LookAndFeel | Look and feel of the demo image (background, theme, sounds, etc.) |
KITL Connection
Platform Builder communicates with a device using KITL protocol. For details about KITL refer to Microsoft's KITL Broadcast article.
The following actions should be performed in order to setup a KITL connection between the CM-X300 and Platform Builder 6.0:
- Ensure that a serial terminal is connected to the CM-X300 as described in Setting up a console
- Ensure that an Ethernet cable is connected to the CM-X300 platform
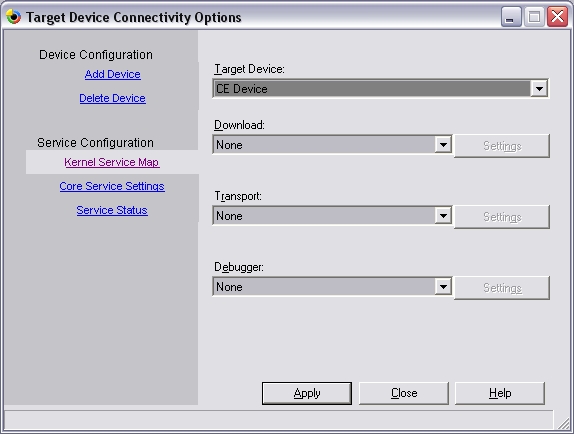
- In Platform Builder, go to Target->Connectivity Options .

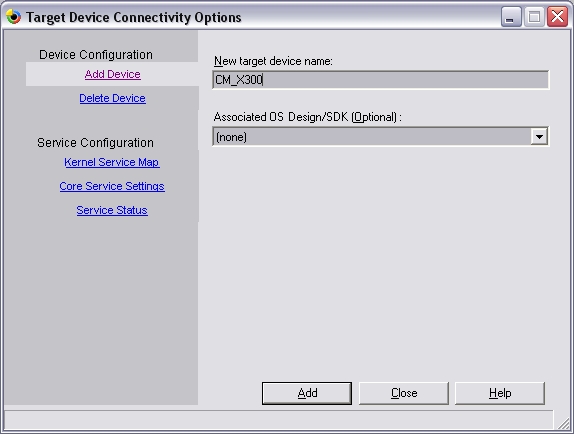
- Click on Add Device and provide a device name (such as CM-X300).
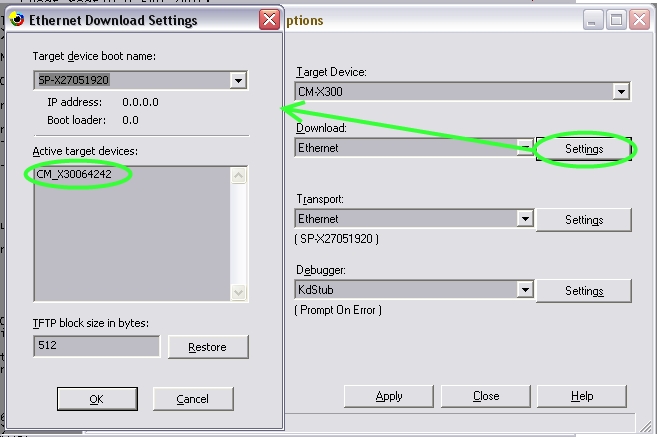
- In Kernel Service Map, select Ethernet for Download and Transport options and KdStub for the Debugger.
- Press Download settings and at the same time, נoot the target device and press SPACE in the device console to get Eboot main menu.
- Type "D" to download the image from Platform Builder (results in a broadcast of BOOT ME messages).
- Platform Builder will show the target device unique name (e.g. CM_X30064242) in the Active Devices area.
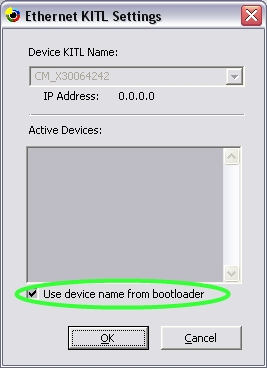
- Press Transport settings and select Use device name from bootloader.
Once the connection is configured, download and launch the newly created WinCE image:
- In Platform Builder Target toolbar, select the configured device and then select Target->Attach Device .
- Ensure that Eboot is ready for download (i.e. Sends Boot Me messages).
Image Debugging
Platform Debugging with RETAILMSG
Debug messages output to the serial port may be enabled for both Retail and Debug build types.
To enable RETAILMSG output to COM-A serial port, set the "STUART Usage" option to "Debug Serial" in the BSP Configuration menu in Eboot
Platform Debugging over Ethernet
KITL allows platform debugging over Ethernet and enables use of VS2005 Remote Tools. During debug session, KITL redirects all the serial output into VS2005 output window.
- Choose the following platform options to enable platform debugging:
- Enable kernel debugger.
- Enable KITL.
- Perform Build->Advanced Build Commands ->Rebuild Current BSP and Subprojects .
- Start the debug session as described in Setup Target for CM_X300 Image Evaluation section.
| Run-time image built with the Kernel debugger and KITL dedicates CM-X300 Ethernet port to debug communication. This port cannot be used for application Ethernet traffic. The application Ethernet traffic can be routed through virtual VMINI adapter that should be enabled in Eboot configuration. |


