CM-X300: WinCE: Demo Image
The Windows Embedded CE Demo for CM-X300 is based on the standard Windows Embedded CE 6.0 R3.
Contents
- 1 CM-X300 Features Supported
- 2 Demo Image Contents
- 3 Get Connected with ActiveSync
- 4 Demo Image Componentes
- 4.1 RAM
- 4.2 NAND Flash
- 4.3 Persistent Registry
- 4.4 Networking
- 4.5 USB
- 4.6 SD card
- 4.7 Touch Screen
- 4.8 Keypad
- 4.9 Display Subsystem
- 4.10 Backlight
- 4.11 Battery and Charging
- 4.12 Suspend / Resume
- 4.13 Serial Ports
- 4.14 Wireless Interface Control
- 4.15 Bluetooth
- 4.16 Reboot
- 4.17 Run Once Functionality
- 4.18 Running custom applications on startup
- 5 Sample Applications
- 6 Miscellaneous Utilities
- 7 See Also
CM-X300 Features Supported
The CM-X300 Demo image supports the following features:
- NAND Flash Disk
- TFT LCD (pre configured for Toppoly TD035STEE1 TFT 480x640)
- Audio (input/output)
- Wi-Fi 801.11b/g
- Bluetooth
- Suspend / Resume
- USB 1.1 Host / Salve
- USB 2.0 Slave
- Ethernet
- Serial ports
- SD/MMC CARD
- GPIO access
- I2C/SPI bus
- Touch screen
- Keypad
- RTC (H/W rev. 1.2 and up)
- Backlight
- Battery management
- VIP / Quick capture interface (currently with limited functionality)
Demo Image Contents
The following standard Windows Embedded CE components are included in this demo image:
- File system Explorer
- ActiveSync
- AYGShell
- Internet Explorer XAML UI Sample Browser
- Gestures Support
- Flash Lite ActiveX control
- Windows Media Player
- Telnet Server
- TCPMP Player
- ItaskMgr (a PC-like task manager)
- All MS Bluetooth Profiles
| For a complete list of the components included in the image refer to the Components list. |
Get Connected with ActiveSync
ActiveSync enables data synchronization between a desktop computer and the CM-X300. You must install ActiveSync on your PC before connecting it to the CM-X300.
On the Host PC
Hosts running Windows XP
- Download and Install ActiveSync from Microsoft website.
- ActiveSync may experience connection problems caused by Windows desktop firewall applications. Read the ActiveSync Troubleshooting Guide for host PC configuration instructions.
- Ensure that ActiveSync synchronization via USB is enabled in the Connection Settings dialog box

Installing ActiveSync driver for the CM-X300
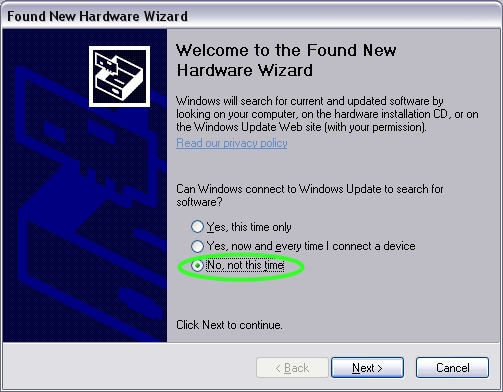
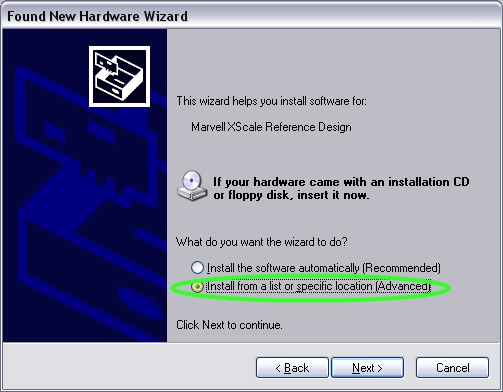
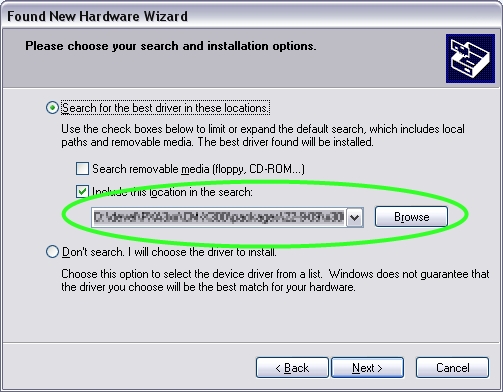
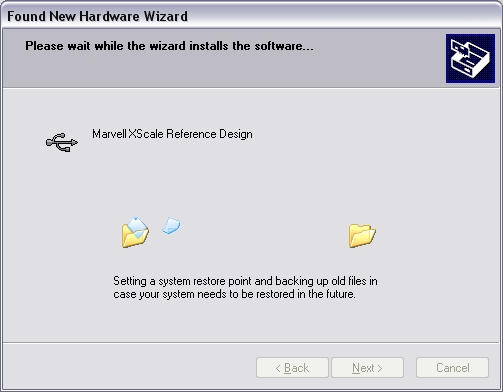
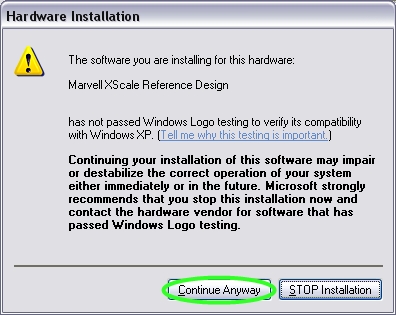
- On the first connection the "New hardware found" wizard appears. Please follow the selections depicted below:
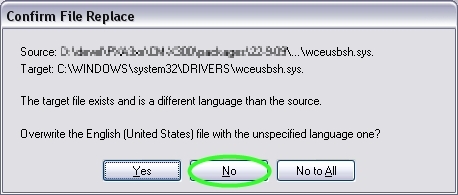
- If the following confirmation dialog pops up, choose "No":
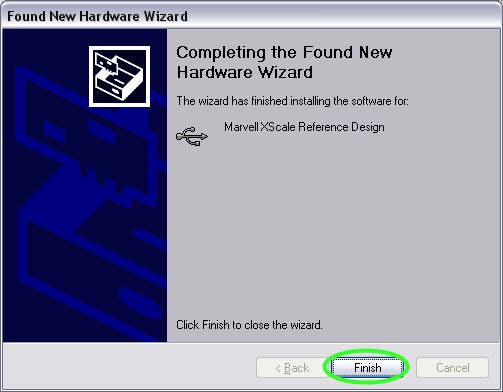
- Now ActiveSync setup is complete.


Hosts running Windows Vista/7
- Download and install the latest version of Windows Mobile Device Center (WMDC) for Windows 7 from Microsoft website
- Ensure that the CM-X300 registry has [HKEY_LOCAL_MACHINE\Drivers\USB\FunctionDrivers\Serial_Class] key with the following value:
[HKEY_LOCAL_MACHINE\Drivers\USB\FunctionDrivers\Serial_Class]
     "idVendor"=dword:045E
     "idProduct"=dword:00ce
- - A dedicated Vendor ID should be purchased and used for mass production.
- - CM-X300 registry may be altered as described in the RegEdit section.
On the Target (CM-X300)
PXA300 processor (C624 option)
- Connect a USB cable to the USB 2.0 port (connector P8 on SB-X300) or to the USB 1.1 slave port (connector P10 on SB-X300).
- USB 2.0 is the default configuration.
PXA310 processor (C624M option)
- Configure the USB port to function as Slave as described in USB section.
- Connect a USB cable to the connector P10 on SB-X300.
Demo Image Componentes
The demo image is packed into the raw NK.bin file that is stored in the CM-X300 NAND flash during installation.
RAM
The CM-X300 supplied with the evaluation kit is equipped with 128MB of RAM. The demo image requires approximately 40MB and leaves 88MB for application use.
NAND Flash
The CM-X300 supplied with the evaluation kit is equipped with 512MB NAND flash. U-Boot and Eboot bootloaders are stored in the NAND flash.
During demo image installation, the NAND flash is automatically partitioned and space is reserved for the runtime image, which is stored in the NAND flash unpartitioned space.
Space for a second runtime image is reserved to facilitate a fail-safe update mechanism.
Approximately 400 MB of free space is available for data storage on the NAND. Data may be stored in the NAND directory ("\nandflash").
Persistent Registry
The demo image is built with a "Hive-Based Registry" option. This means that the system registry is stored in the NAND flash data partition, making registry entries persistent when the device is powered off.The demo image is configured with a "Lazy Flush" registry policy. The registry settings are stored in RAM and are flushed into the NAND Flash every 30 seconds. After changing registry settings, allow 30 seconds before turning off the power or performing a hardware reset. This will ensure that the changes are saved into the NAND flash.
The flush period may be changed through the following registry value:
[HKEY_LOCAL_MACHINE\System\ObjectStore\RegFlush]
        "FlushPeriod"=dword:7530
Networking
The following network interfaces are supported in the demo image:
- CM-X300 Ethernet - Full-featured 10/100 Ethernet interface. Implemented with the Davicom DA9000A Ethernet controller on the CM-X300 module.
- Wireless LAN - incorporates full-featured 802.11 b/g capabilities. Implemented with the Wi2Wi W2SW0001 WLAN controller on the CM-X300 module.
The demo image image is configured to use a DHCP server to obtain network settings for the two network adapters. Network settings may be changed in the Windows CE Control Panel.
Defining static IP address
It is possible to configure a static IP address by modifying the registry.
For example, the following registry settings disable DHCP and define the static IP 10.1.1.144 for the CM-X300 Ethernet controller:
[HKEY_LOCAL_MACHINE\Comm\DM9CE1\Parms\TcpIp]
    "EnableDHCP"=dword:0
    "IpAddress"="10.1.1.44"
    "Subnetmask"="255.255.255.0"
    "DefaultGateway"="10.1.1.1"
    "UseZeroBroadcast"=dword:0
A static IP may be assigned to the Ethernet interface using Eboot configuration menu. For further details please refer to Configuring Eboot article.
USB
PXA300
- Connector P10 on SB-X300 provides a USB host port that operates at full/low speed.
- - The port may be configured in Eboot to operate as a device port at full/low speed. See Configuring Eboot.
- Connector P8 on SB-X300 provides a USB device port (used mainly for ActiveSync).
PXA310
- Connector P10 on SB-X300 provides a USB host port that operates at full/low speed.
- The port may also function as high speed device. The USB port configuration may be changed in the Windows CE Control Panel. Use Start->Settings->Control Panel->USB Functionality Chooser to switch between USB host and USB device functionality. The CM-X300 system should be restarted to activate the new settings.
SD card
- The SB-X300 evaluation board features an SD socket (connector P14).
- When an SD card is inserted it is mounted automatically as “Storage Card” under “My Device”.
- The demo image has been tested successfully with the following types of SD cards: SanDisk Ultra III 2Gb, Kingston 2Gb, SanDisk 1Gb, and Kingston Micro SDHC 4Gb.
Touch Screen
The demo image is calibrated for the Toppoly TD035STEE1 LCD touch screen. To fine-tune the calibration, run the touch screen calibrator on the first boot by tapping Start->Settings->Control Panel->Stylus->Calibration . For further details about touch screen calibrator registry settings refer to the Touch Screen (Stylus) Registry Settings MSDN article.
The Touch Screen sensitivity is controlled by the HKEY_LOCAL_MACHINE\HARDWARE\DEVICEMAP\TOUCH registry key:
[HKEY_LOCAL_MACHINE\HARDWARE\DEVICEMAP\TOUCH]
      "Sensitivity"=dword:30
The "Sensitivity" value is a hexadecimal number between 1 and 3F. The lower values correspond to higher panel sensitivity.
Reboot the device after a change.
Keypad
The demo image is configured to support the 3x3 keypad provided with the CM-X300 evaluation kit.
The default key mappings are listed below:
- "Left", "Right", "Up", "Down" buttons control cursor movement (SW3, SW7, SW4, SW6 respectively)
- "SW5" button acts as "Enter" key
- "SW1" (Func1) button launches Internet Explorer
- "SW2" (Func2) button launches Media Player
- "SW8" (Func3) button launches ItaskMgr
- "SW9" (Func4) button launches Windows Explorer
The application assignment to particular keys is defined in the following registry settings:
[HKEY_LOCAL_MACHINE\SOFTWARE\Compulab\KeyPad]
	"APP1"= "\\Windows\\iesample.exe"
	"APP2"= "\\Windows\\ceplayer.exe"
	"APP3"= "\\Windows\\itaskmgr.exe"
	"APP4"= "\\Windows\\explorer.exe"
Display Subsystem
The demo image is configured for a Toppoly TD035STEE1 TFT LCD. The default resolution is 480x640 with 16-bit color depth and portrait display.
Using custom display settings
The LCDAdapt utility included in the Windows CE 6 run-time image package allows easy configuration of LCD timing parameters. The LCDAdapt utility runs on the host PC and connects to the CM-X300 device using the ActiveSync.
- The necessary values are extracted from the specification of the display.
- Hovering with the mouse pointer over each field will display a tool tip with an explanation.
- Press the "Connect" button to connect to the device.
- The LCDAdapt will read the current settings on the device and display them.
- Use LCD parameters extracted from the display specification to fill in the settings
- Press the "Send Settings" button. The LCDAdapt utility will configure the LCD controller on the CM-X300 and restart it.

The program changes the following registry settings on the device:
[HKEY_LOCAL_MACHINE\Drivers\Display\GPE]
        "HorizontalSize"=dword:1E0
        "VerticalSize"=dword:280
        "Bpp"=dword:10	; Bytes per pixel
        "BLW"=dword:7	; Timing
        "ELW"=dword:17	; Timing
        "HSW"=dword:8	; Timing
        "BFW"=dword:2	; Timing
        "EFW"=dword:4	; Timing
        "VSW"=dword:2	; Timing
        "104M"=dword:4	; PCD
        "156M"=dword:6	; PCD
        "208M"=dword:9	; PCD
        "39M"=dword:0	; PCD
        "D0CS"=dword:2	; PCD
        "OEP"=dword:0	; Polarity
        "PCP"=dword:1	; Polarity
        "HSP"=dword:1	; Polarity
        "VSP"=dword:1	; Polarity
| The LCDAdapt utility requires .Net 3.x framework installed on the host PC |
For additional details about CompuLab LCD adaptation services, please refer to LCD Panel support.
Video Playback
The package supports playback of the following video formats:
- MPEG4
- H.264
- MPEG2
- 3GP
Media playback requires installation of codec pack available in the Utilities\GraphicAcceleration\Graphics\Cab\HWCodecsCMX300 CAB archive.
The project that generates the CAB file is located in the same directory.
The rest of the graphics examples are located in Utilities\GraphicAcceleration\Graphics and there is no documentation available for them.
Backlight
The CM-X300 supports seven levels of backlight brightness.
The backlight level can be modified in the Windows CE Control Panel. Use Start->Settings->Control Panel-> Backlight Level to adjust the brightness. The backlight level altered directly via the HKEY_CURRENT_USER\ControlPanel\BackLight registry key:
[HKEY_CURRENT_USER\ControlPanel\BackLight]
       "BacklightLevel"=dword:0
Battery and Charging
The CM-X300 evaluation kit is shipped with a 3000mAh Li battery. For detailed instructions about the battery connection please refer to the SB-X300 manual.
Monitor the battery power by tapping Start->Settings->Control Panel->Power .
The CM-X300 / SB-X300 supports battery charging using the power cable supplied with the evaluation kit. For detailed instructions about the battery connection refer to the SB-X300 manual.The charging mechanism utilizes fast charging method with a charge current of 1000mA.
The battery driver must be enabled in the Eboot menu. Refer to Configuring Eboot article.
Suspend / Resume
The CM-X300 Windows CE demo image enters suspend mode upon one of the following events:
- Start->Suspend menu entry activation.
- Rising edge detection on GPIO83.
- Rtc_cmd.exe invocation. Rtc_cmd.exe is a console application with the following syntax:
rtc_cmd [time before sleep in seconds] <sleep time in seconds>
The system wakes up upon one of the following events:
- Rising edge detection on GPIO83.
- RTC timer (set by Rtc_cmd.exe) expiration.
Serial Ports
The demo image supports three serial ports. The serial ports mapping is summarized below:
| UART | Connector
on SB-X300 |
COM-port | Notes |
|---|---|---|---|
| STUART | P16 | COM4 | Used for diagnostic messages. Please refer to Configuring Eboot for configuration |
| BTUART | P6 | COM5 | |
| FFUART | P4 | COM1 | Not available with PXA310 CPU (C624M option) |
The serial ports operate at baud rates up to 3.6M. For more details please refer to the PXA3xx developers manual.
Wireless Interface Control
Bluetooth and WiFi power state is controlled by the Control Panel, Start->Settings->Control Panel->Wireless Config .
The initial state of the wireless devices may be configured in Eboot as described at Configuring Eboot.
Bluetooth
The demo image includes the following Microsoft Bluetooth profiles:
- Object Push Profile (OBEX)
- File Transfer Profile
- Human Interface Device Profile
- LAN Access Profile
- Personal Area Network Profile
- Hands-free and headset Profiles
The CM-X300 Bluetooth connectivity was verified with Motorola HT820 Bluetooth Stereo Headphones with A2DP profile.
Bluetooth Manager located at Start->Settings->Control Panel->Bluetooth Device Properties allows to scan for remote Bluetooth devices and pair with them. Bluetooth Audio connection AdpMgr sample is available at Start->Programs->A2dpMgr.
Reboot
Use the "Software Reboot" shortcut on the desktop to reboot the system. The "Software Reboot" ensures proper system shutdown and registry flush.
Run Once Functionality
Run Once functionality allows addition of custom files and registry modifications after Windows CE image installation.
During the first boot the Windows CE image searches for RunOnceCab.cab archive on SD card and USB flash drive. If the archive is found, it is loaded and executed. The Run Once functionality is disabled after the first boot is complete.
Running custom applications on startup
In order to run a custom application on the system startup, use the AutoLaunch utility integrated into the demo image.
The AutoLaunch utility extends the functionality of the HKEY_LOCAL_MACHINE\Init registry key and allowing configurable launch delay for each application. AutoLaunch monitors the following registry keys and values:
[HKEY_LOCAL_MACHINE\Startup]
	“Process0” =”Application.exe param1 param2”
	“Process0Delay”=dword:delay ;in milliseconds

[HKEY_LOCAL_MACHINE\Startup\ApplicationName]
	“Process0” =”Application.exe param1 param2”
	“Process0Delay”=dword:delay ;in milliseconds
Usage example:
[HKEY_LOCAL_MACHINE\Startup\ceplayer]
	"Process0” =”ceplayer.exe \windows\sound2.wav”
	“Process0Delay”= dword:1388 ;5000 in decimal
The above example launches CEPlayer five seconds after boot completion. The additional "\windows\Sound2.wav" parameter is used by CEPlayer to play the specified file.
Sample Applications
The Windows CE demo image package includes demo applications that demonstrate how to use common interfaces such as SPI, I2C and GPIO. They applications are located at the Demo Applications directory.
GPIO Sample
This application demonstrates how to use the GPIO driver in order to control the state of GPIO pins.
For further details, please refer to GPIOs Programming.
I2C Sample
The I2C sample demonstrates how to use the I2C driver.
Fur further reading refer to I2C Programming.
SPI Sample
The SPI_Thermometer sample included in the WinCE demo image package, demonstrates how to use the SPI driver.
For further details, please refer to SPI Programming.
C#
The COMPortTester sample demonstrates a simple C# application that interfaces with the COM ports.
SilverlightPlayerExample
The SilverlightPlayerExample sample demonstrates basic use of Silverlight.
Miscellaneous Utilities
SetPowerState
A command line utility that performs global system power state transitions. Syntax:
SetPowerState.exe <State> [HexStateFlags [HexOptions]]
- State - the system power state defined in the registry. Possible values are: Reboot and Suspend.
- StateFlags - specifies hexadecimal state flags, e.g. 200000 (POWER_STATE_SUSPEND).
- Options - specifies hexadecimal options, e.g. 1000 (POWER_FORCE).
The most useful transitions are:
- SetPowerState reboot - performs watchdog reboot of the CM-X300.
- SetPowerState suspend - puts the CM-X300 into the suspend mode.
| Before each power state transition, the registry is flushed to the NAND flash |
SysConf
A command line utility that allows easier debugging of the platform. For further details please refer to Sysconf article.
A2DP Demo Application
Th A2DP utility allows the user to pair with a BlueTooth device and activate the A2DP BlueTooth profile. The program is available with full source code.
RegEdit
An embedded registry editor able to write/read/delete registry values. Syntax:
reg.exe <(-)Registry Key> (h) <Value>
- "-" before a Registry Key deletes the value
- "h" modifier should be used for hexadecimal values
An OnDevice registry editor is available at: Bruce Eitman's Blog.
SetWiFiPowerMode
The SetWiFiPowerMode utility activates WiFi power-saving mode. This significantly reduces the WiFi power consumption, however WiFi performance is degraded in this mode.
This program is located at \Utilities\SetWiFiPowerMode
| This utility is not included in the NK.bin itself |
LCDAdapt
This utility helps to integrate a custom LCD display. Please refer to Using custom display settings.