Difference between revisions of "IOT-GATE-RPi: Getting Started"
imported>Igor.vaisbein |
|||
| Line 3: | Line 3: | ||
=== Front view & Rear view === | === Front view & Rear view === | ||
: [[Image:IOT-GATE-RPi-overview-front-back.png|1200px]] | : [[Image:IOT-GATE-RPi-overview-front-back.png|1200px]] | ||
| − | === | + | === Left view & Right view (with FCSD add-on) === |
<br> | <br> | ||
| − | : [[Image:IOT-GATE-RPi-overview-side. | + | : [[Image:IOT-GATE-RPi-overview-side-panels.png|1200px]] |
<br> | <br> | ||
| Line 17: | Line 17: | ||
* Insert the AC power-supply blade into the power supply unit. | * Insert the AC power-supply blade into the power supply unit. | ||
* Insert the power supply plug into the IOT-GATE-RPi power jack. Turn the power plug clockwise to lock the plug. | * Insert the power supply plug into the IOT-GATE-RPi power jack. Turn the power plug clockwise to lock the plug. | ||
| − | * IOT-GATE- | + | * IOT-GATE-RPi will automatically boot into the OS. |
[[Category:IOT-GATE-RPi]] | [[Category:IOT-GATE-RPi]] | ||
Latest revision as of 09:42, 27 January 2020
Contents
IOT-GATE-RPi Overview
Front view & Rear view
Left view & Right view (with FCSD add-on)
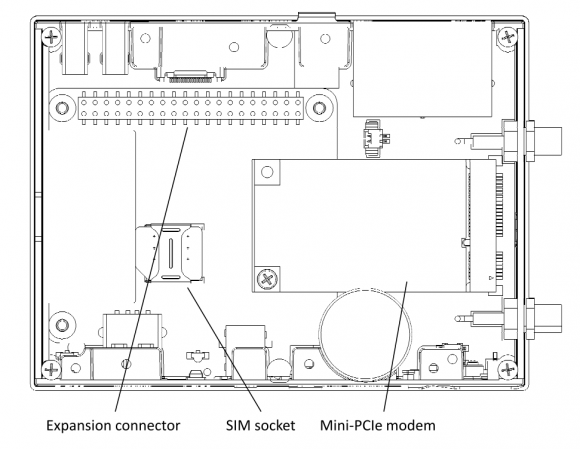
Service bay view
Quick Setup
- Connect HDMI monitor to the IOT-GATE-RPi HDMI display output using a standard HDMI cable.
- Connect USB mouse and keyboard devices to the IOT-GATE-RPi USB connectors.
- Insert the AC power-supply blade into the power supply unit.
- Insert the power supply plug into the IOT-GATE-RPi power jack. Turn the power plug clockwise to lock the plug.
- IOT-GATE-RPi will automatically boot into the OS.


