CM-T3730: WinCE: Getting Started
Contents
Connecting the module
The following picture shows the recommended evaluation kit setup for the SB-T3X.
- -
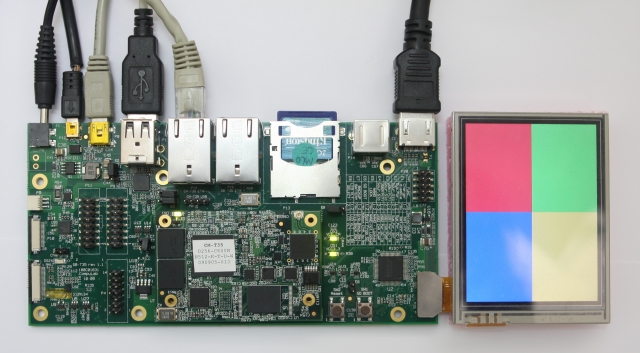

| In the CM-T3730 the SD card is installed on the module's micro SD slot (P5) |
Preparing a bootable SD/microSD card
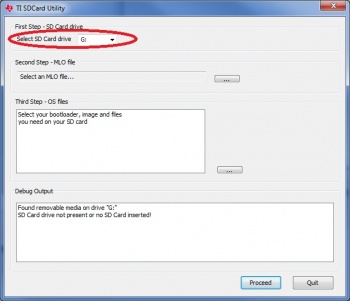
| The TI SDCard boot utility does not work well on computers running Windows 7, use Windows XP (WinXP mode in Windows 7 works fine too.) |
- Download the latest WinCE 6.0 runtime image for CM-T3730 and unzip the file.
- Prepare SD card with files from LiveDisk_NAND folder in case of using module with NAND flash memory. Prepare microSD with files from LiveDisk_SD folder otherwise.
- Use the TI_SDCard_boot_utility to create a disk with partition table geometry compatible with the OMAP3 boot ROM on needed card.
- Follow the steps below:
- Insert the SD or microSD card into an SD-Reader attached to the desktop computer (a card is supplied with the CM-T3730 evaluation kit).
- Launch the TI_SDCard_boot utility (located in the Utils folder).
- Choose the drive letter of the card reader.
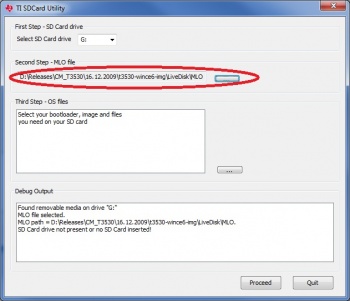
- Select the MLO file from the corresponding LiveDisk_XXX folder.
- Select the rest of the files from the same folder.
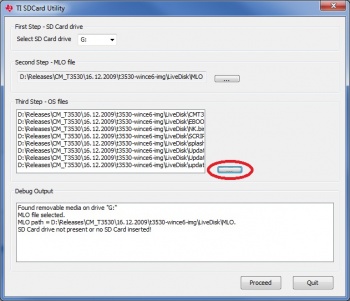
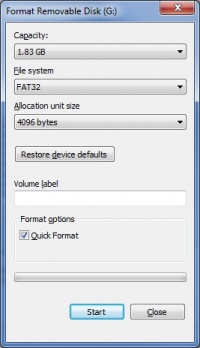
- Select the FAT 32 filesystem and 4096 bytes allocation unit size in the Format Removable Disk pop-up and start the SD/microSD card format process.
- After the formatting is complete, the utility automatically starts to copy the files to the prepared card.
- Wait for the "Copying files done" message to appear in the debug output box.

- Your SD card is now ready to boot the CM-T3730.


Demo Image Installation
There are two main types of storage configuration for the CM-T3730. These configurations require different booting procedure:
- NAND flash memory assembled (The N128 or N512 options). Getting started with these CoMs requires the windows updater to flash the image into the NAND.
- Micro SD slot (NS0G or NS8G option). Using this configuration there is no need to run the updater, the system boots directly from the microSD card.
Installation on modules with NAND flash
- Insert the prepared bootable SD card into the SD socket (connector P13 on SB-T35).
- Configure the CM-T3730 for SD-Boot mode. There are two ways to do it:
- Preferred way: Hold the “SD BOOT” button while booting the device. You should hold the button until the synthetic splash-screen (4 colored squares) appears.
- Installing jumper E6.
- Power on the device. The synthetic splash-screen (4 colored squares) will appear on LCD display within a few seconds.
- An Updater image (dedicated WinCE image) is loaded from the SD-Card. Updater image boot time is approximately 50 seconds.
- The Updater utility will start automatically. The utility will install the runtime image onto the CM-T3730 NAND flash.

- The following message box informs you that the process is complete.

- Make sure jumper E6 is removed. Otherwise, the installation process will be repeated next time you boot the device.
- Use the reset button to reboot the device.
- CompuLab WinCE demo image will be loaded from the NAND flash.
| Please refer to CM-T3X30 Updater Guide for the technical installation process details |
Booting the system from microSD card
- Install the prepared bootable microSD card on the CM-T3730 micro SD slot (P5).
- Power on the device. A synthetic splash-screen (4 colored squares) will appear on LCD display within a few seconds.
- The CompuLab WinCE demo image is loaded from the SD card.