Difference between revisions of "UCM-iMX8M-Mini: Evaluation Kit: Getting Started"
imported>Igor.vaisbein |
imported>Kirill.kapranov (→Starting the system) |
||
| Line 14: | Line 14: | ||
== Starting the system == | == Starting the system == | ||
# Connect the DC 12V power supply adapter (included) to main DC power connector '''J2'''. | # Connect the DC 12V power supply adapter (included) to main DC power connector '''J2'''. | ||
| − | # Follow the messages in your terminal emulator program until you see the linux | + | # Follow the messages in your terminal emulator program until you see the linux shell command line prompt. |
| − | # | + | # The console is automatically logged on as ''root'', a command line interface appears immediately |
| − | |||
| − | |||
{{note|In case of no messages appear in your terminal emulation program, please refer to the detailed [[SB-UCM-iMX8: HOWTO: USB Console|USB console]] guide.}} | {{note|In case of no messages appear in your terminal emulation program, please refer to the detailed [[SB-UCM-iMX8: HOWTO: USB Console|USB console]] guide.}} | ||
<!--'''More Details:''' ''[[SB-UCM-iMX8: Connectors: J6 and J8|Connector J6]]''.--> | <!--'''More Details:''' ''[[SB-UCM-iMX8: Connectors: J6 and J8|Connector J6]]''.--> | ||
| + | |||
== What Next? == | == What Next? == | ||
* [[UCM-iMX8M-Mini NXP iMX8M-Mini Yocto Linux|UCM-iMX8M-Mini Yocto guide]] | * [[UCM-iMX8M-Mini NXP iMX8M-Mini Yocto Linux|UCM-iMX8M-Mini Yocto guide]] | ||
Latest revision as of 17:20, 14 November 2019
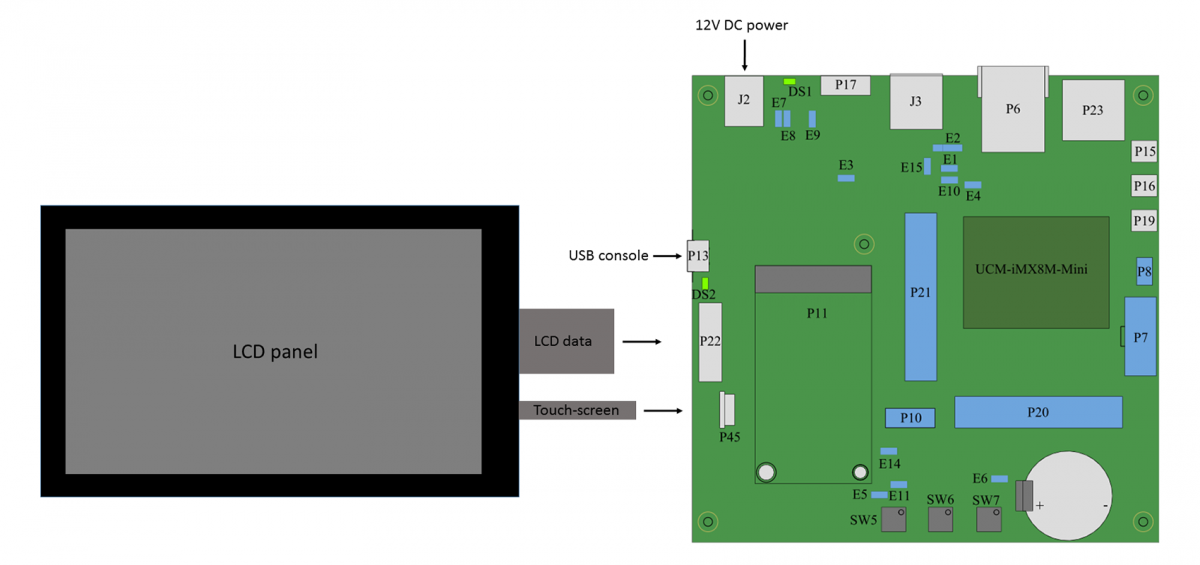
System setup
UCM-iMX8M-Mini evaluation kit is preloaded with Yocto Linux image for UCM-iMX8M-Mini.
- Make sure jumpers E6, E9, and E14 are populated (default state).
- Make sure jumpers E4, E7, E8 and E15 are removed (default state).
- Connect the LCD panel (included in the kit) to connectors P22 and P45. Ensure that the flat cables are fully inserted.
- Connect a standard USB cable (included in the kit) between your host PC and the evaluation kit micro-USB2.0 connector P13.
- On your computer, start a terminal emulation program (such as HyperTerminal) with the following serial port settings:
Baud Rate Data Bits Stop Bits Parity Flow Control 115200 8 1 none none
Starting the system
- Connect the DC 12V power supply adapter (included) to main DC power connector J2.
- Follow the messages in your terminal emulator program until you see the linux shell command line prompt.
- The console is automatically logged on as root, a command line interface appears immediately
| In case of no messages appear in your terminal emulation program, please refer to the detailed USB console guide. |