CL-SOM-iMX6: Evaluation Kit: Hardware Guide
Contents
- 1 Overview
- 2 Carrier Board
- 3 Interfaces and Functions
Overview
Terms and Definitions
Term Definition Evaluation kit A combination of CL-SOM-iMX6 & SB-FX6 boards accompanied by a set of accessories detailed here CL-SOM-iMX6 A system-on-module product described here SB-FX6 A generic carrier board designed to support the CM-FX6 and the CL-SOM-iMX6 evaluation kits from Compulab. SBC-iMX6 CL-SOM-iMX6 populated on top of the SB-FX6 carrier board SoM system-on-module Reference Carrier Board
The evaluation kit is shipped with the SB-FX6 carrier board
The design materials for SB-FX6 (including schematics, PCB layout and Bill of Materials) are available for download from here
Additional resources
Carrier Board
Interfaces and Functions
Main Power
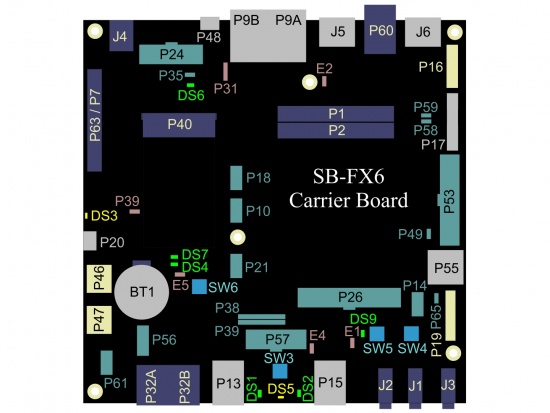
Connector J4 is the main DC power source of this evaluation kit. The DC power supply unit included with the evaluation kit provides 12V DC power to the system through J4.
Serial Console
Serial console is available through one of the following interfaces:
- Serial over USB using micro-USB2.0 Type-B P20 connector. Continue to USB console guide for USB interface setup instructions.
- Serial over RS-232 using the P60 connector with custom RS-232 cable (included with the evaluation kit). Continue to RS-232 console guide for RS-232 interface setup instructions.
USB
A total of 5 CL-SOM-iMX6 USB ports are accessible with this evaluation kit:
- CL-SOM-iMX6 USB2.0 OTG port is available through the OTG connector P48.
- USB Host connection: The micro-USB to USB type-A adapter included with evaluation kit (available for purchase here) allows usage of connector P48 as a standard USB2.00 host port.
- USB Gadget connection: A standard micro-USB cable (included with evaluation kit) enables connection of the evaluation kit as a USB gadget to the USB port of your host computer.
- CL-SOM-iMX6 USB 2.0 Host Ports 1 through 4 are available through the following connectors:
- USB2.0 Host port 1 (from CL-SOM-iMX6 onboard hub) is accessible through the bottom socket of P13 connector
- USB2.0 Host port 2 (from CL-SOM-iMX6 onboard hub) is accessible through the top socket of P13 connector
- USB2.0 Host port 3 (from CL-SOM-iMX6 onboard hub) is accessible through the bottom socket of P15 connector
- USB2.0 Host port 4 (from CL-SOM-iMX6 onboard hub) is accessible through one of the following (depending on state of Jumper P31):
P31 Setting USB port 4 availability 1-2 USB Type-A (P15 top) 2-3 mini-PCIe (P40) N.A. Controlled by Software
Ethernet
The kit features two 1Gbps copper Ethernet ports. While the first ethernet port is implemented fully onboard CL-SOM-iMX6 module, the second port is implemented onboard SB-FX6 using the PCI-Express port available with CL-SOM-iMX6. Both ports are exposed through the P9 Dual RJ45 connector.
Primary Ethernet
The primary Ethernet port (also referred to as CM Ethernet, SOM ETH or Module Ethernet) is available through the left side of the dual RJ45 connector P9 (also called (P9A).
Secondary Ethernet
The secondary Ethernet port (also referred to as SB Ethernet, SB ETH or 2nd Ethrnet) is available through the right side of the dual RJ45 connector P9 (also called P9B). The P31 jumper setting determines whether the CL-SOM-iMX6 PCI-Express interface is utilized for the secondary ethernet port (Ethernet is available through P9B) or for the P40 mini-PCIe socket (Ethernet is not available through P9B) onboard SB-FX6.
P31 Setting Secondary Ethernet port availability through P9B 1-2 Available 2-3 N.A. N.A. Availability determined by Software
PCI-Express
The PCI-Express interface available with CL-SOM-iMX6 is shared between the secondary ethernet (through P9B) and the P40 mini-PCI-Express card slot. P40 availability of the PCI-Express interface is determined by the P31 jumper setting as follows:
P31 Setting PCI-Express availability through P40 mini-PCIe slot 1-2 N.A 2-3 Available N.A. Availability determined by Software
SATA
The Serial ATA (SATA) interface available with CL-SOM-iMX6 is accessible through one of the following connectors:
- P7/P63 SATA connector
- P40 mini-PCIe slot (mSATA)
Standard SATA
The Evaluation kit supports connection of standard SATA Mechanical and SSD drives to the system through the P7/P63 standard SATA connector. Support of the SATA drives is determined by jumper P31 setting as follows:
P31 Setting SATA Drives support on connector P7/P63 1-2 N.A. 2-3 Supported N.A. Availability determined by Software mSATA
The Evaluation kit supports mSATA form-factor drives through the P40 miniPCIe connector. Support of the mSATA drives is determined by jumper P31 setting as follows:
P31 Setting SATA Drives support on mPCIe slot P40 1-2 N.A. 2-3 Supported N.A. Availability determined by Software
CAN Bus
CAN bus nodes can be connected to evaluation kit header P61 as described in CAN node connection guide.
Wireless
WiFi/Bluetooth
Connect the antenna (included with evaluation kit) to CL-SOM-iMX6 connectors J1/J2 for WiFi and/or Bluetooth operation.
Cellular
USB and/or PCI-express interfaced cellular modems (2G/3G/4G etc.) can be plugged into connector P40 (mini-PCI-Express) as explained below:
- Short pins 2 & 3 of header P31 with a jumper cap.
- Plug your modem into P40 mini PCI-Express connector.
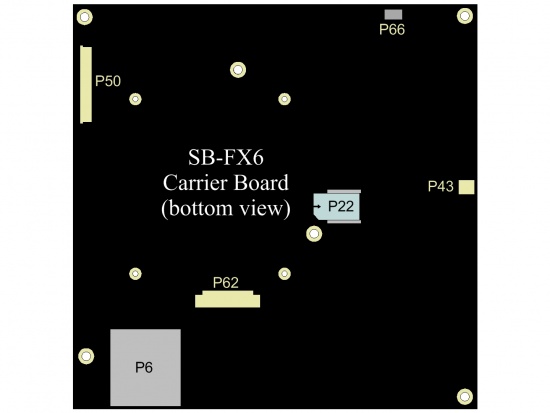
- Insert your micro-SIM card into the P22 micro-SIM slot (only relevant if your cellular modem requires sim card access while not featuring an onboard SIM slot).
Display
CL-SOM-iMX6 evaluation platform has built in support for 7 different connectors up to 4 of which can operate simultaneously.
HDMI
The HDMI display interface is accessible through the HDMI connector J5. Default configuration of Debian Linux for CL-SOM-iMX6 uses HDMI as primary video output.
DVI
The DVI display interface is accessible through the HDMI connector J5:
LVDS 0
The CL-SOM-iMX6 LVDS Display 0 Interface Signals are accessible through evaluation kit header P53. This header enables simple connection (with jumper wires) to any LVDS panel. Please refer to SB-FX6 schematics for detailed information on P53.
LVDS 1
The CL-SOM-iMX6 LVDS Display 1 Interface is accessible through the P17 FPC connector. P17 is compatible with the NL10276BC20-12 LCD panel.

this evaluation kit does not provide backlight supply to the NL10276BC20-12 panel. NL10276BC20-12 backlight power must be provided externally HannStar HSD050IDW1/Startek KD050C-1A LCD
Evaluation kit supports the HannStar HSD050IDW1 / Startek KD050C-1A LCD panels (one is included with the evaluation kit) through the P50 dedicated FPC connector. These LCD panels assembly is integrated with a resistive touch panel enabled by CL-SOM-iMX6 onboard resistive touch panel controller.
TRULY TFT480800-56-E REV 1.0 LCD
Evaluation kit supports the TRULY TFT480800-56-E REV 1.0 LCD panel through P19 dedicated FPC connector. The TRULY TFT480800-56-E REV 1.0 LCD utilizes the MIPI-DSI display interface available with CL-SOM-iMX6
Touch Panel Interface
The CL-SOM-iMX6 resistive touch panel interface is accessible through the P58 and P59 headers. Any 4-wire resistive touch panel can be tested with the system by connecting to P58 and P59 through use of jumper-wires.
Camera
Parallel Camera Interface
The Parallel camera interface signals (if available*) are accessible through one of the following interfaces (but not both simultaneously).
- P57 Header - Designed to allow the flexibility of using jumper-wires allowing connection of any camera with a parallel interface.
- P62 FPC connector - Enabling simple connection with the VIP-ADP board

By default, some of the CL-SOM-iMX6 parallel camera interface signals are not available with this evaluation kit, please refer to CL-SOM-iMX6 reference manual for details MIPI camera interface MIPI-CSI
The MIPI-CSI Camera interface is available through the P66 dedicated connector. P66 is compatible with the Leopard Imaging LI-OV5640-MIPI-AF camera module
SD Card support
SB-FX6 allows access to up to 3 of the CL-SOM-iMX6 interfaces.
- SDIO1 (if available with CL-SOM-iMX6) is accessible through the P55 micro-SD socket.
- SDIO2 (if available with CL-SOM-iMX6) is accessible through the P21 header.
- SDIO3 is accessible through the P6 full-size SD card slot.
Audio
Analog Audio
Listening to Audio
- Plug your headphones into J3 (AUDIO_OUT) audio jack
- Enable audio playback through the Analog audio interface (using software)
Recording Audio from Line-in
- Plug your audio source into J2 (AUDIO_IN) audio jack
- Enable audio recording from the Analog audio line-in interface (using software)
Recording Audio from Mirophone
- Plug a standard PC Microphone into J1 (MIC_IN) audio jack
- Enable audio recording from the Analog audio microphone interface (using software)
S/PDIF
Audio Playback through S/PDIF
- Plug your coaxial S/PDIF receiver to the P46 COAX connector.
- Enable audio playback through the S/PDIF audio interface (using software)
Recording Audio from S/PDIF source
- Plug your coaxial S/PDIF source to the P47 COAX connector.
- Enable audio recording from the S/PDIF interface (using software)
HDMI
- Plug your Television/or HDMI capable monitor (with speakers) into the J5 HDMI connector
- Enable audio playback through the HDMI interface (using software)
I2S/PCM
UART and RS232/RS422/RS485
RS-232, RS-422 and RS-485 interfaces are available through the dual RJ11 connector P32. The UART signals are Available through header P56. CL-SOM-iMX6 UART1, UART2 and UART5 interfaces are utilized to support functions at P32 and P56.
- The interface exposed through P32A connector (left side of P32) utilizes the CL-SOM-iMX6 UART2 interface. Either half or full duplex operation is supported through P32A. P32A operation mode, duplex and other settings are set by software.
- The interface exposed through P32B connector (right side of P32) utilizes either UART5 or UART1. Only full duplex operation is supported through P32B. P32B operation mode and other settings are set by software.
| UART5 signals are not available with this evaluation kit by default. Please refer to CL-SOM-iMX6 reference manual for details. |
| Some of the UART2 signals are not available with this evaluation kit by default. Please refer to CL-SOM-iMX6 reference manual for details. |
Multifunctional signals access
The following headers allow access to multifunctional signals (if available) of CL-SOM-iMX6
- P56 (UART Header)
- P26 (Camera Header)
- P21 (SDIO2 Header)
- P18 (OTHER Header)
| Please refer to CL-SOM-iMX6 reference manual for signal availability information |
SPI
CL-SOM-iMX6 SPI5 interface is accessible (if available) through the P21 header. CL-SOM-iMX6 SPI2 interface utilized for communicating and LCD panel with this evaluation kit. One can test SPI2 functionality using wire-up from connector P16 or P50 if LCD is not required.

The SPI5 interface signals are not available with this evaluation kit by default. Please refer to CL-SOM-iMX6 reference guide for details on signal availability I2C
CL-SOM-iMX6 I2C1 bus interface (at 3.3V) is accessible through the P35 header.
GPIO
- Any multifunctional signal available through the CL-SOM-iMX6 carrier board interface can be configured by SW to function as a GPIO. It is recommended to use the multifunctional pins accessible through the SB-FX6 headers above (P56, P26, P21 and P18) to evaluate GPIO functionality.
- Additional, SB-FX6 implemented GPIO signals(eGPIO), are available through the P36 and P38 Headers.
System
Reset
Pressing the reset button (SW4) triggers evaluation kit cold reset.
Boot Sequence Selection
Evaluation kit supports normal and alternate boot sequences. Detailed description of the sequences is available in the CL-SOM-iMX6 reference guide.
- Pressing and holding the ALT.BOOT button (SW5) during power-up or cold reset forces alternate boot sequence (boot from SD card on SDIO3 interface).
- Populating the E1 jumper, constantly forces alternative boot sequence.
- Indication of selected boot sequence is shown with the DS9 LED.
ON/OFF button
- Pressing ON/OFF button (SW3) generates a wake/power-on request.
- Pressing and holding (>5sec) SW3 button results in system switch off.
RTC
The evaluation kit RTC (implemented onboard CL-SOM-iMX6) is powered by a coin cell battery. RTC power can be disconnected by removing the coin cell battery from BH1 battery holder.
Jumpers Summary
- E1 - Boot Sequence Selection. Populate to force alternate boot sequence.
- E2 - CL-SOM-iMX6 onboard EEPROM and bootloader storage write-protection. Populate to enable the EEPROM write protection and allow bootloader storage write-protection.
- E4 - i.MX6 JTAG_MOD jumper. Populate jumper to place i.MX6 SoC into SW debug mode.
- E5 - Console selection jumper. Populate to force RS-232 console through P60.
- P31 - PCI-Express / USB port 4 / SATA interface / 2nd Ethernet availability selection jumper. Refer to respective chapters for details.
- P39 - Li-Ion Charger disable jumper. Populate to disable Li-Ion battery changer.

