CM-T335: WEC7: OSDesign Configuration
Contents
BSP Package Installation
- Close the Platform Builder Application.
- Copy the CM_T335_BSP directory into \WINCE700\Platform.
- Copy the CM_T335 directory into \WINCE700\OSDesigns.
- Copy the COMMON_TI_V1 directory into \WINCE700\Platform\Common\Src\Soc.
- Launch VS2008 and open \WINCE700\OSDesigns\CM_T335\CM_T335.sln
Building the Platform Project
The CM-T335 Platform Project is used to build CompuLab’s WinCE demo image. It includes many components and is highly recommended as a starting point. The demo image size is relatively large, ~60 MB. A custom Windows CE image built for a specific application is typically much smaller.
In order to build the CM-T335 platform, select the "Open >Project/Solution" command from the File menu of the VS2008 and select the \WINCE700\OSDesigns\CM_T335\CM_T335.sln file. The Platform Project and the workspace will be opened.
Make sure that the project is configured for Release mode(the full debug or checked image are very large and it is not recommended to build it). Perform "Rebuild Solution" from the "Build" menu (alternatively you can perform "Build-Advanced Build Commands->Clean Sysgen"). The build process takes about 15-20 minutes.
Build Options
- Use Build->Advanced Build Commands->Sysgen when you add/remove Platform Builder components (Catalog items) to/from the project.
- Use Build->Advanced Build Commands-> Build Current BSP and Subprojects when you add/remove CompuLab BSP Platform Builder components to/from the project or perform changes in BSP files.
| Do not use Build->Advanced Build Commands->Build and Sysgen or Build->Advanced Build Commands->Rebuild and Clean Sysgen commands that compile and perform sysgen on the entire Platform Builder tree. In fact, it is recommended to permanently remove these two commands from the build menu. |
Setup Target for CM-T335 Image Evaluation
Ensure that you have a serial terminal connected to the CM-T335 evaluation platform as described in Console setup. Also, ensure that the CM-T335 Ethernet port (connector P2 on the SB-T335) is connected to your local network.
Perform the following steps to setup a connection between the CM-T335 evaluation platform and Platform Builder 7.0 :
- In Platform Builder, go to Target >> Connectivity Options.
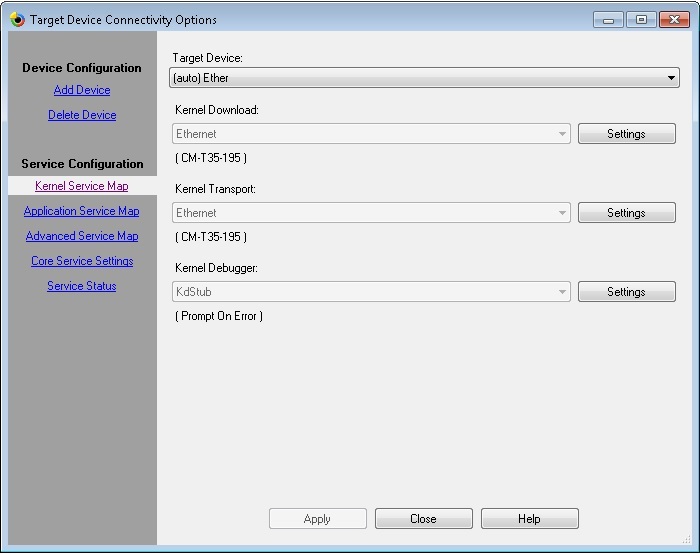
- In Kernel Service Map, select Ethernet for Download and Transport options and KdStub for the Debugger.
- Press Kernel Download settings, it will popup the following:
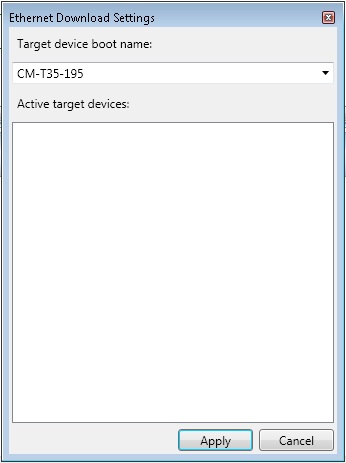
- Boot the target device and press "SPACE" in the device console to get Eboot main menu.
- In the Eboot menu:
- Type "2". The "Select Boot Device" menu appears.
- Type "1" to choose LAN9115 MAC as your boot device.
- Type "0" to start the download (results in a broadcast of BOOT ME messages).
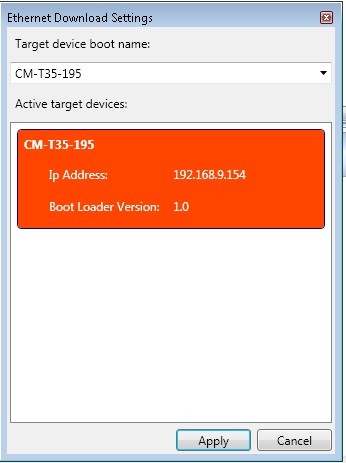
- Platform Builder will show the target device unique name (e.g. CM-T35-195) in the "Active Devices" area.
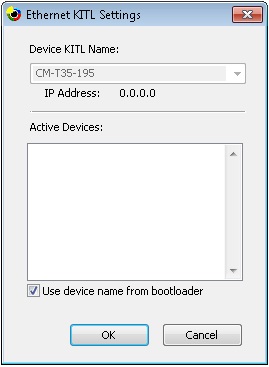
- Press Transport settings and select "Use device name from bootloader".


Once the connection is configured, you can download and launch the newly created WinCE image:
- In Platform Builder Target toolbar, select the configured device and then select "Target" >> "Attach Device".
- Ensure that Eboot is ready for download (i.e. sends "BOOT ME" messages).
WinCE Image Customization
There are two ways to customize the Windows CE image:
- Recommended method: Add or remove BSP components from the demo CM_T335 project.
- Create a new platform project and then manually add all the necessary BSP components as described in the Platform Builder documentation. Refer to Windows Embedded Compact OSDesign Development page.
Managing BSP components with Platform Builder Catalog
You can select the BSP components you want to include in the run-time image by using the Platform Builder Catalog GUI. In case no significant BSP modifications are required, this is the easiest way to configure the image.
Device driver removal from the image is illustrated by the following example:
- Open catalog view in Platform Builder.
- Expand CM_T335->"Third Party"->BSP->CM_T335_BSP:ARMV7 in "Catalog Items View".
- Clear the component you want to remove. In this example the Keypad driver will not be included in the run-time image

- Once the components selection is complete, rebuild the BSP (clean build) in order for the changes to take effect.

Advanced BSP customization using batch files
Each CM_T335_BSP component can be enabled with BSP_<Component Name> environment variables.
The BSP_<Component Name> variables are set in Platform Builder Catalog and also can be set in CM_T335_BSP\CM_T335_BSP.bat file.
For example, in order to include the keypad driver in the BSP, set the BSP_KEYPAD variable (by choosing the Keypad Driver catalog item or set the BSP_KEYPAD variable in the .bat file).
| Environment variables defined in CM_T335_BSP\CM_T335_BSP.bat override the variables defined in Platform Builder project |
RAM-Based Registry support
Default BSP configuration enables HIVE-based registry with lazy flushing. In order to support a RAM-Based registry, you should:
- Add the “RAM-based Registry” (SYSGEN_FSREGRAM) component to your project.
- Add the “RAM and ROM File System” (SYSGEN_FSRAMROM) component to your project.
- Perform a Clean Sysgen by using Build->Advanced Build Commands->Clean Sysgen.
Platform Debugging over Ethernet
- Choose the following platform options for the debug:
- Enable kernel debugger.
- Enable KITL.
- Ensure that the regular (release) options are selected:
- Enable Eboot Space in memory.
- Perform Build->Advanced Build Commands ->Rebuild Current BSP and Subprojects.
| Run-time image built with the Kernel debugger and KITL dedicates CM-T335 Ethernet port to debug communication. This port cannot be used for application Ethernet traffic. |
- Start the debug session as outlined in Setup Target for CM-T335 Image Evaluation.
Kernel Mode vs. Application Debugging
Visual Studio 2008 provides two distinct types of debuggers.
The kernel mode debugger allows debugging of CE device drivers and kernel mode code. The kernel debugger can set breakpoints in the code that is automatically loaded at startup. This debugger utilizes the KITL protocol and supports various types of physical transports (Ethernet, USB and serial). The kernel debugger can be used to debug native code applications. It cannot be used to debug .NET managed code applications.
The VS 2008 application debugger allows .NET managed code debugging. This debugger is activated automatically whenever managed code runs.
The KITL transport and kernel mode debuggers are activated, when VS 2008 is attached to a target platform for kernel mode debugging. This prevents the activation of the application debugger. In order to run the application debugger while the kernel mode debugger is still active and connected to a target platform, you must load a separate instance of VS 2008. That instance can then connect to the target platform using the configured transport and activate its application debugger. Break points may be set in both the application and kernel mode debuggers running in separate instances of the VS 2008. However, if a break point hits in the kernel debugger and the CE kernel remains halted for too long, the application debugger might disconnect from the target platform.